This page will guide you through our setup process on a Kindle Fire HD tablet.
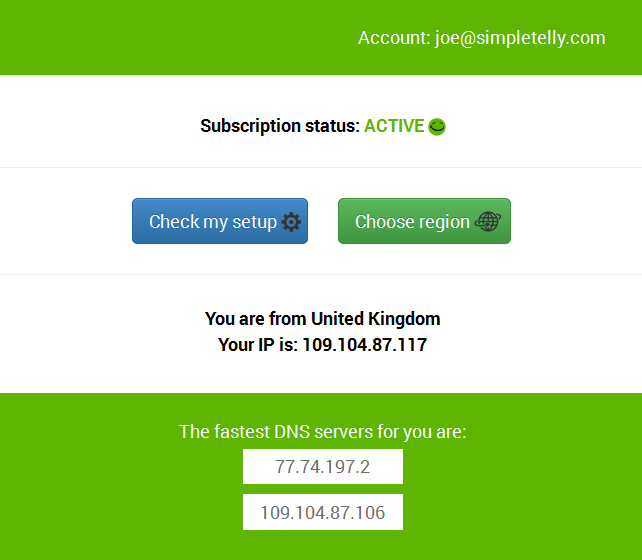
Login to our website, www.simpletelly.com from your Kindle browser. Take note of the fastest DNS server address that appears on screen.
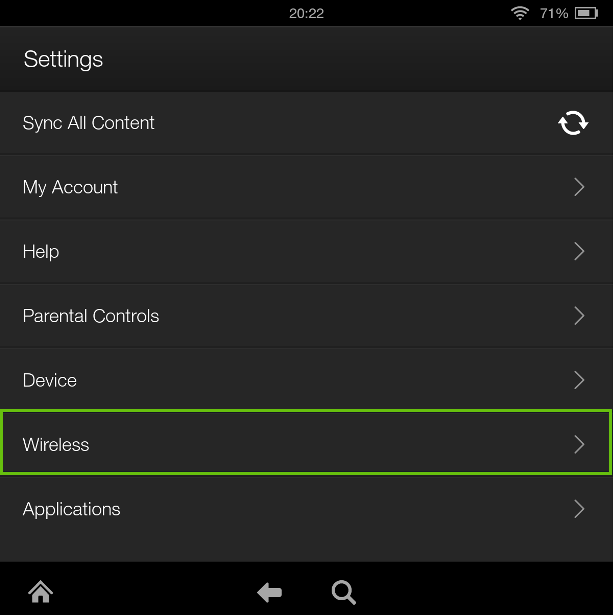
Now, swipe down the notification bar to access the Quick Settings page and then tap on Wireless or go into Settings and then tap on Wireless Settings.
Wi-Fi Network Settings
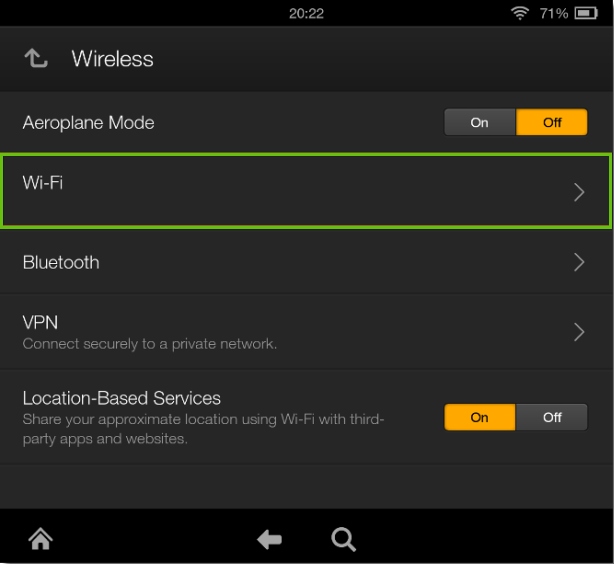
In the Wireless settings menu, tap on Wi-Fi.
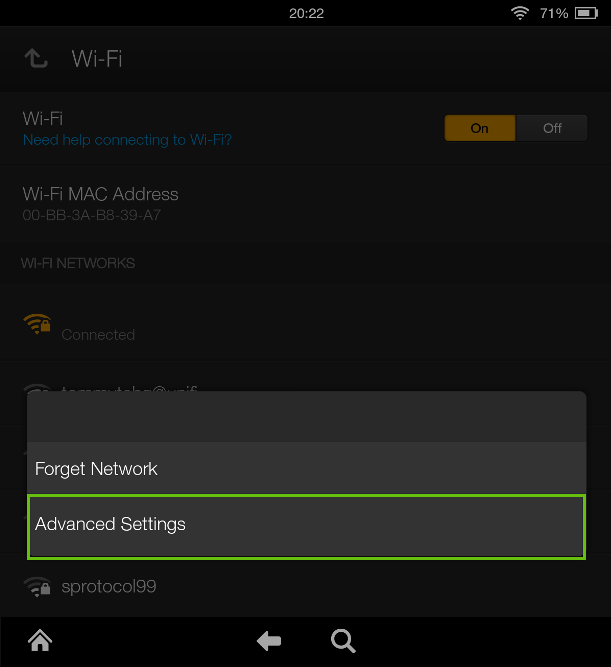
Tap and hold on your current connected Wi-Fi connection until a pop-up window appears and choose Advanced Settings
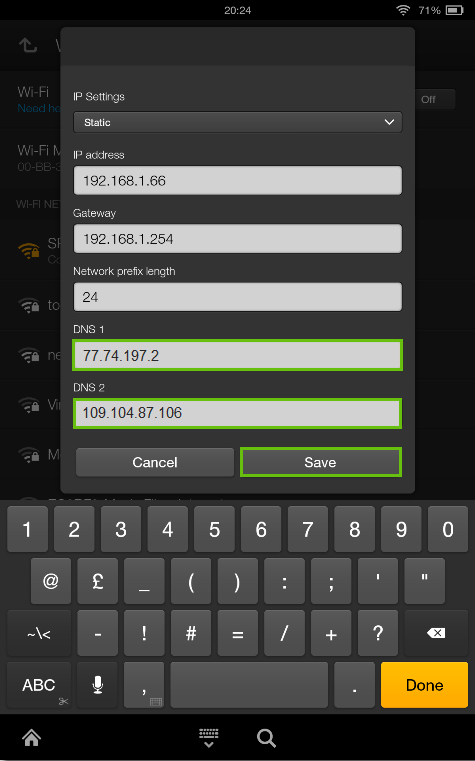
Set DNS on wireless network
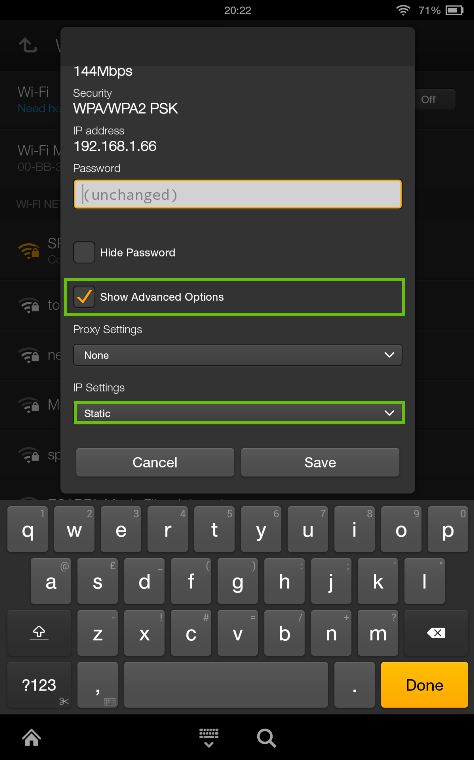
Next, tap on Show Advanced Options, scroll down below and change the IP settings to Static.
Scroll down until you see the DNS settings and enter the addresses that appeared on your browser earlier into the DNS 1 and DNS 2 entries.
Tap Save to save the changes.
Register DNS on Network
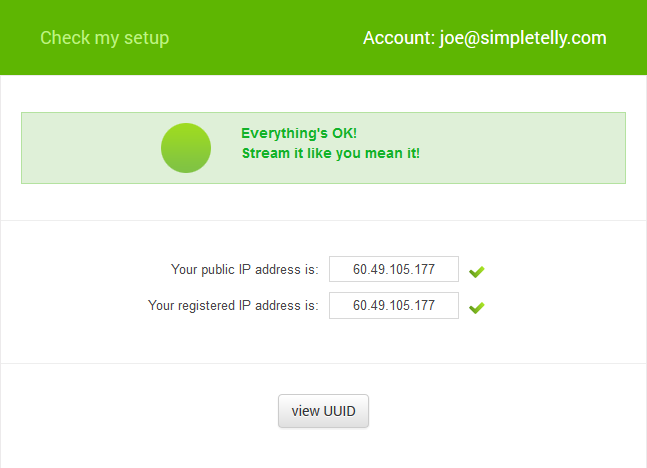
Once you have done that, go back to your account page from your device and click on Check My Setup.
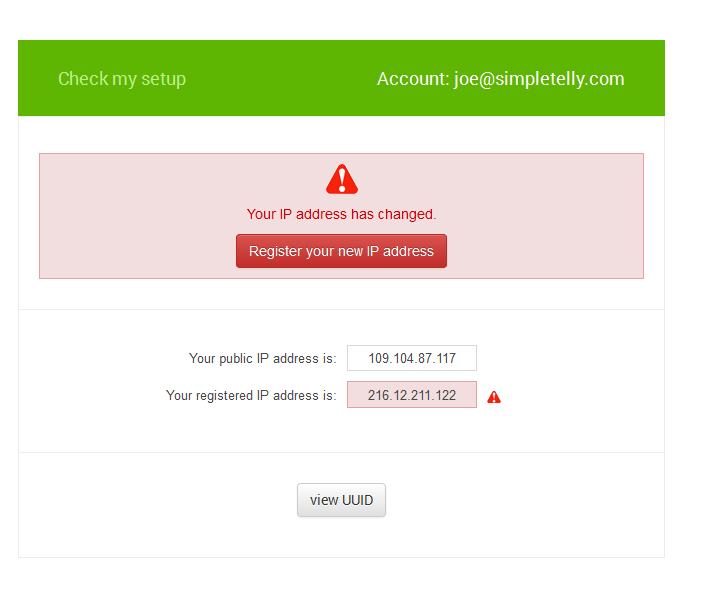
If this is the first time you are setting up the service from this location, you will probably need to register your current IP address. Click on Register your new IP address.
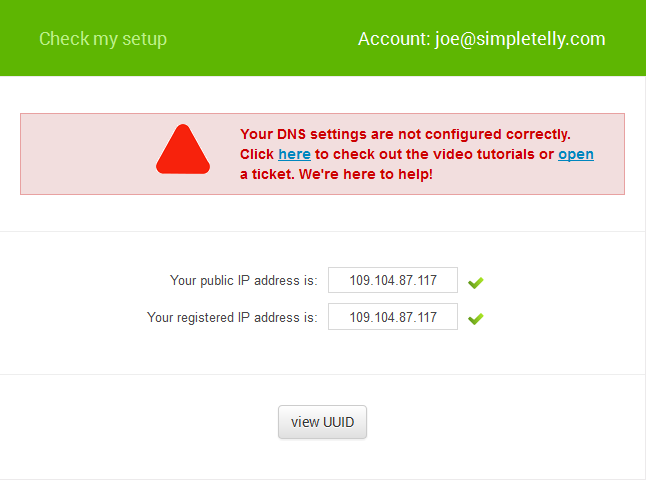
You will get Everything's OK! message on your screen if your IP has been registered successfully in our system.
Kindle Setup complete
Now that you have setup and registered your system you can go ahead and access the TV site of your choice and stream it like you mean it!.
For the full list of supported channels, please refer to our Supported Services page.
Any problems?
Unfortunately it doesn't always go to plan! If you are having problems please email us at support@simpletelly.com and we will do our best to assist you.
While we have not tested the service on the LG Smart TV ourselves, we know the service works based on feedbacks from customers who had tried it on their TV.
If you would like to give this a try on your TV, kindly refer to the step by step here.
Setting up DNS on the Network
Note, while the LG Smart TV has an inbuilt web browser, we recommend that you use a computer to register your IP on our network.
Please ensure that you have completed this and you are able to connect to the Internet from the TV before trying the steps below.
Login to our website, www.simpletelly.com from a computer on the same network as your LG Smart TV.
Take note of the fastest DNS server address that appears on screen.
Now, click on Check My Setup.
If this is the first device you have setup from this location, you will probably need to register your current IP address. Click on Register your new IP address.
If the registration is done from a computer browser rather than using the device's browser, you will get this error on screen. You can disregard this as the DNS is set up on the device and you just need to ensure that the Registered IP address is the same as your Public IP address.
LG Smart TV Network setup (WebOS 3)
Press the settings button on the remote to access the All Settings page.
Click on Network.
Select Wifi Connections if you are using Wi-Fi to connect or Wired Connection (Ethernet) if you are using cable.
On Wi-Fi, select Advanced Wi-Fi Settings or Advanced Wired Settings if you are on cable.
Uncheck Set Automatically.
Select the DNS Server field.
Type in one of the MyDNS address that you got from our site earlier.
Click Connect to confirm the entry.
If you are on an older version of LG Smart TV and the above steps doesn’t apply to you, head to Step #4:
LG Smart TV Network setup (legacy interface)
1) Press the Settings button on the remote.
2) Navigate to Network and select Network Connection.
3) Go to Network Settings.
4) Press Start Connection.
5) Select your wireless network, if you're using Wifi, and select "Other Network List".
6) Scroll down and select the "Set Expert" button.
7) Scroll down to the DNS Mode box.
8) Select the Manual Tab
9) Type in the DNS numbers that you got from our site earlier.
10) Confirm the entry.
11) Your TV will now test the connection.
12) Press Complete to complete the setup.
LG Smart TV Setup Complete
Return to your TV home menu and if your IP is already registered and the DNS is set up correctly, you should be able to access the relevant Media Apps and stream it like you mean it!.
For the full list of supported channels, please refer to our Supported Services page.
Any problems?
Unfortunately it doesn't always go to plan!
If you are having problems please email us at support@simpletelly.com and we will do our best to assist you.
This page will guide you through the setup process on a Samsung Smart TV.
Note, while the Smart TV has an inbuilt web browser, we recommend that you use a computer to register your IP on our network.
Please ensure that you have completed this and you are able to connect to the Internet from the TV before trying the steps below.
Login to our website, www.simpletelly.com from a computer on the same network as your Samsung Smart TV.
Take note of the fastest DNS server address that appears on screen.
Register DNS on Network
Now, click on Check My Setup.
If this is the first device you have setup from this location, you will probably need to register your current IP address. Click on Register your new IP address.
If the registration is done from a computer browser rather than using the device's browser, you will get this error on screen. You can disregard this as the DNS is set up on the device and you just need to ensure that the Registered IP address is the same as your Public IP address.
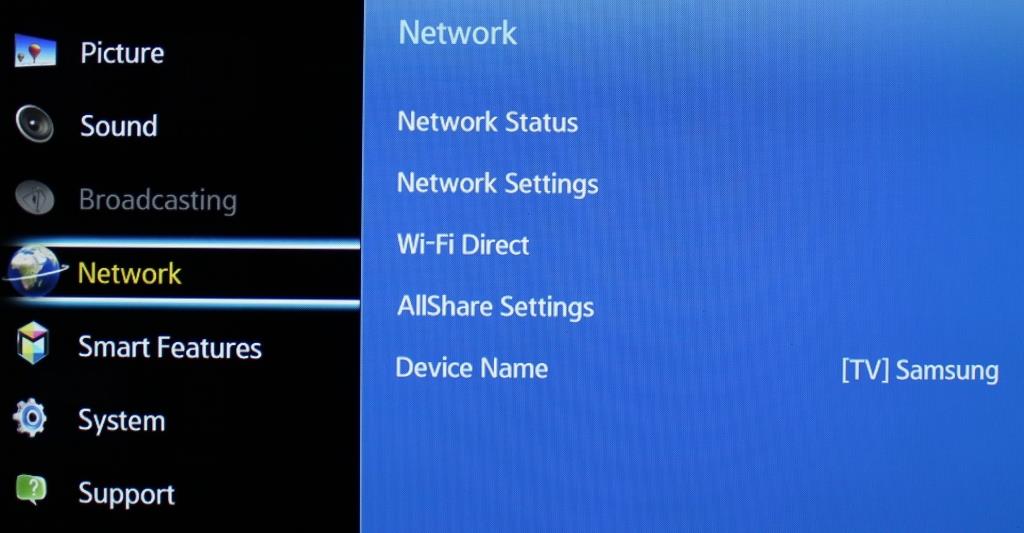
Network Menu
From your Samsung Smart TV home screen, click on Menu.
Scroll down to Network.
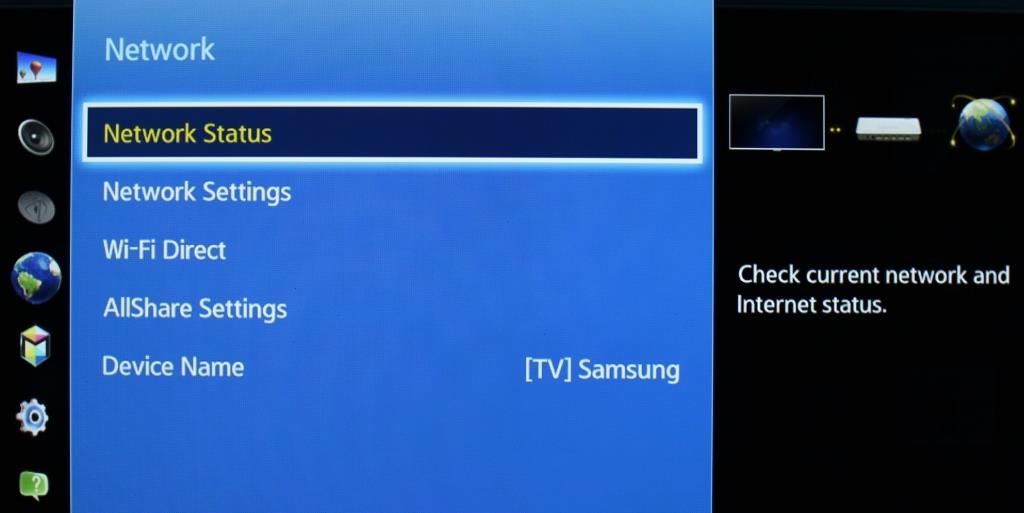
You should now be in the Network overview page, click on Network Status.
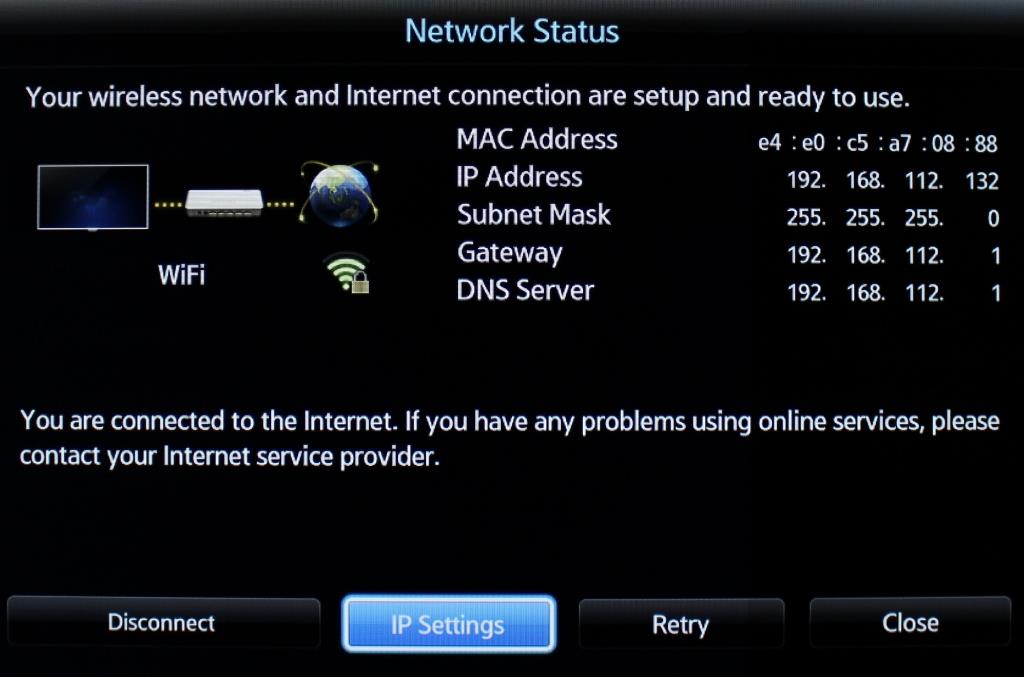
Set DNS on TV
Now select IP Settings.
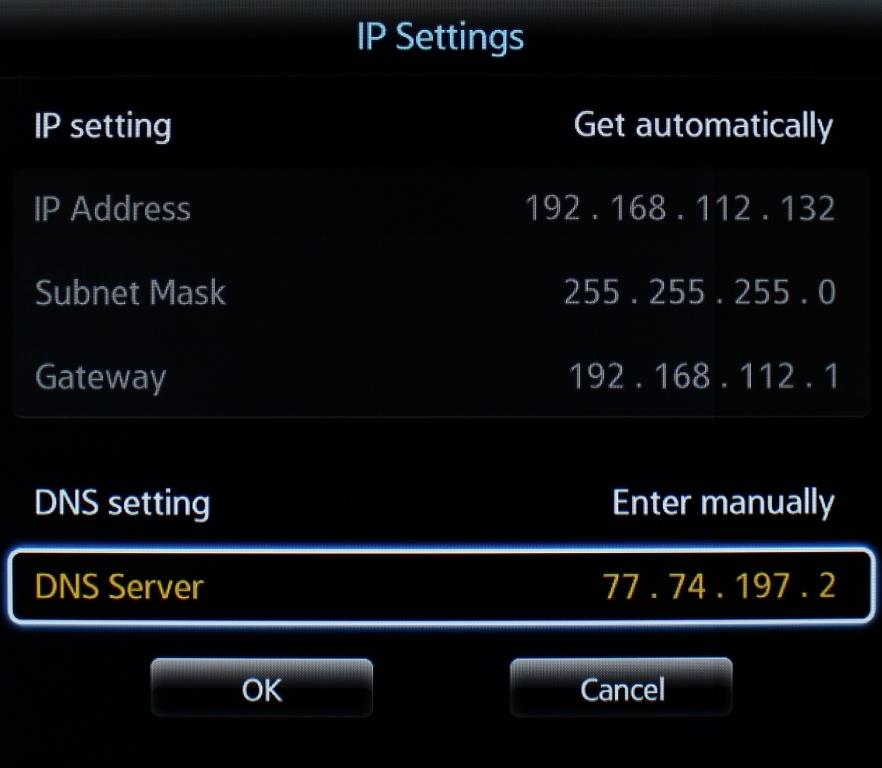
In IP Settings, you will need to change your DNS setting from Get Automatically to Enter Manually.
Now, enter the DNS server addresses that appeared on your browser earlier and click OK.
Samsung Smart TV Setup Complete
Return to the Smart Hub and if your IP is already registered and the DNS is set up correctly, you should be able to access the relevant Media Apps and stream it like you mean it!.
Note: If you are unable to view or download region restricted apps such as Netflix, Hulu etc, please ensure your Smart TV region is set to the country that you want the apps from.
Please refer to our FAQ here which will guide you on how to achieve this.
For the full list of supported channels, please refer to our Supported Services page.
Any problems?
Unfortunately it doesn't always go to plan!
If you are having problems please email us at support@simpletelly.com and we will do our best to assist you.
This page will guide you through the setup process on a Sony Bravia Smart TV.
Note, while the Bravia has an inbuilt web browser, we recommend that you use a computer to register your IP on our network.
Please ensure that you have completed this and you are able to connect to the Internet from the TV before trying the steps below.
Login to our website, www.simpletelly.com from a computer on the same network as your TV.
Take note of the fastest DNS server address that appears on screen.
Register DNS on Network
Now, click on Check My Setup.
If this is the first device you have setup from this location, you will probably need to register your current IP address. Click on Register your new IP address.
If the registration is done from a computer browser rather than using the device's browser, you will get this error on screen. You can disregard this as the DNS is set up on the device and you just need to ensure that the Registered IP address is the same as your Public IP address.
Network Menu
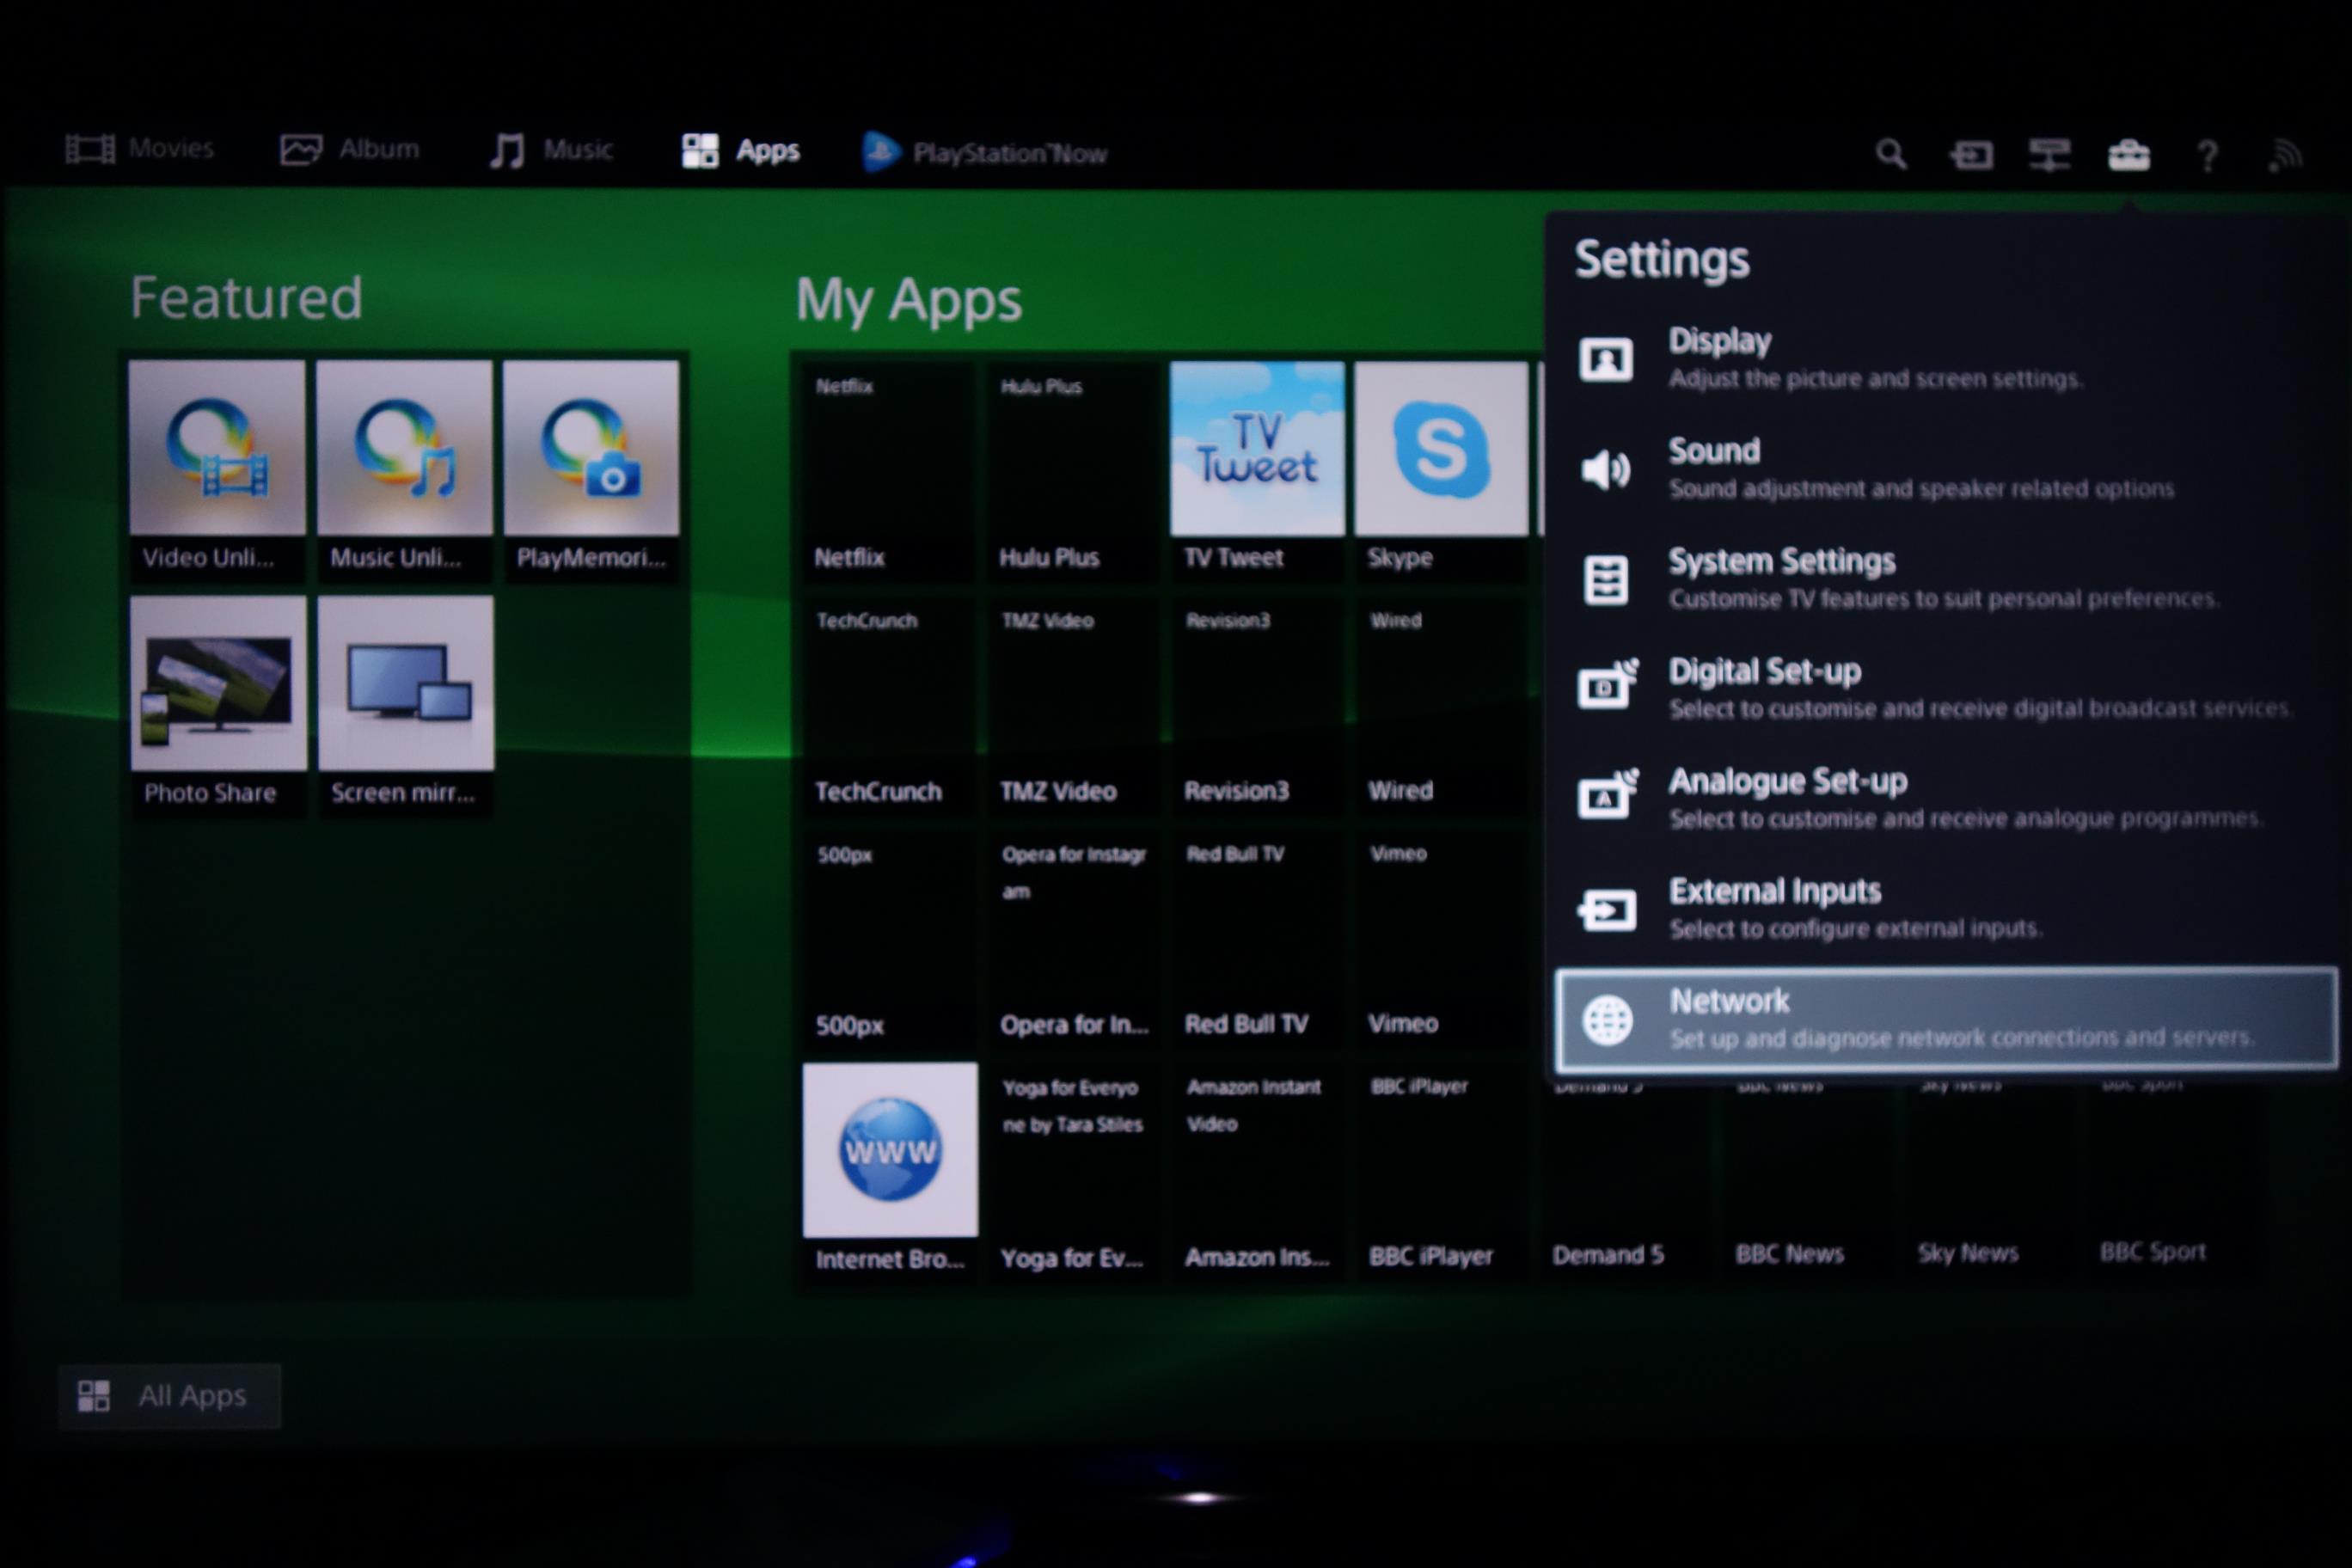
From your Bravia Sony Entertainment Network (SEN) Screen, please navigate to the top right hand corner of the screen to find the Settings menu.
Once you've selected the Settings menu, scroll down to the Network option.
Next, you will be taken to a list of options to choose from. Please choose the first option, which is Network Set-up.
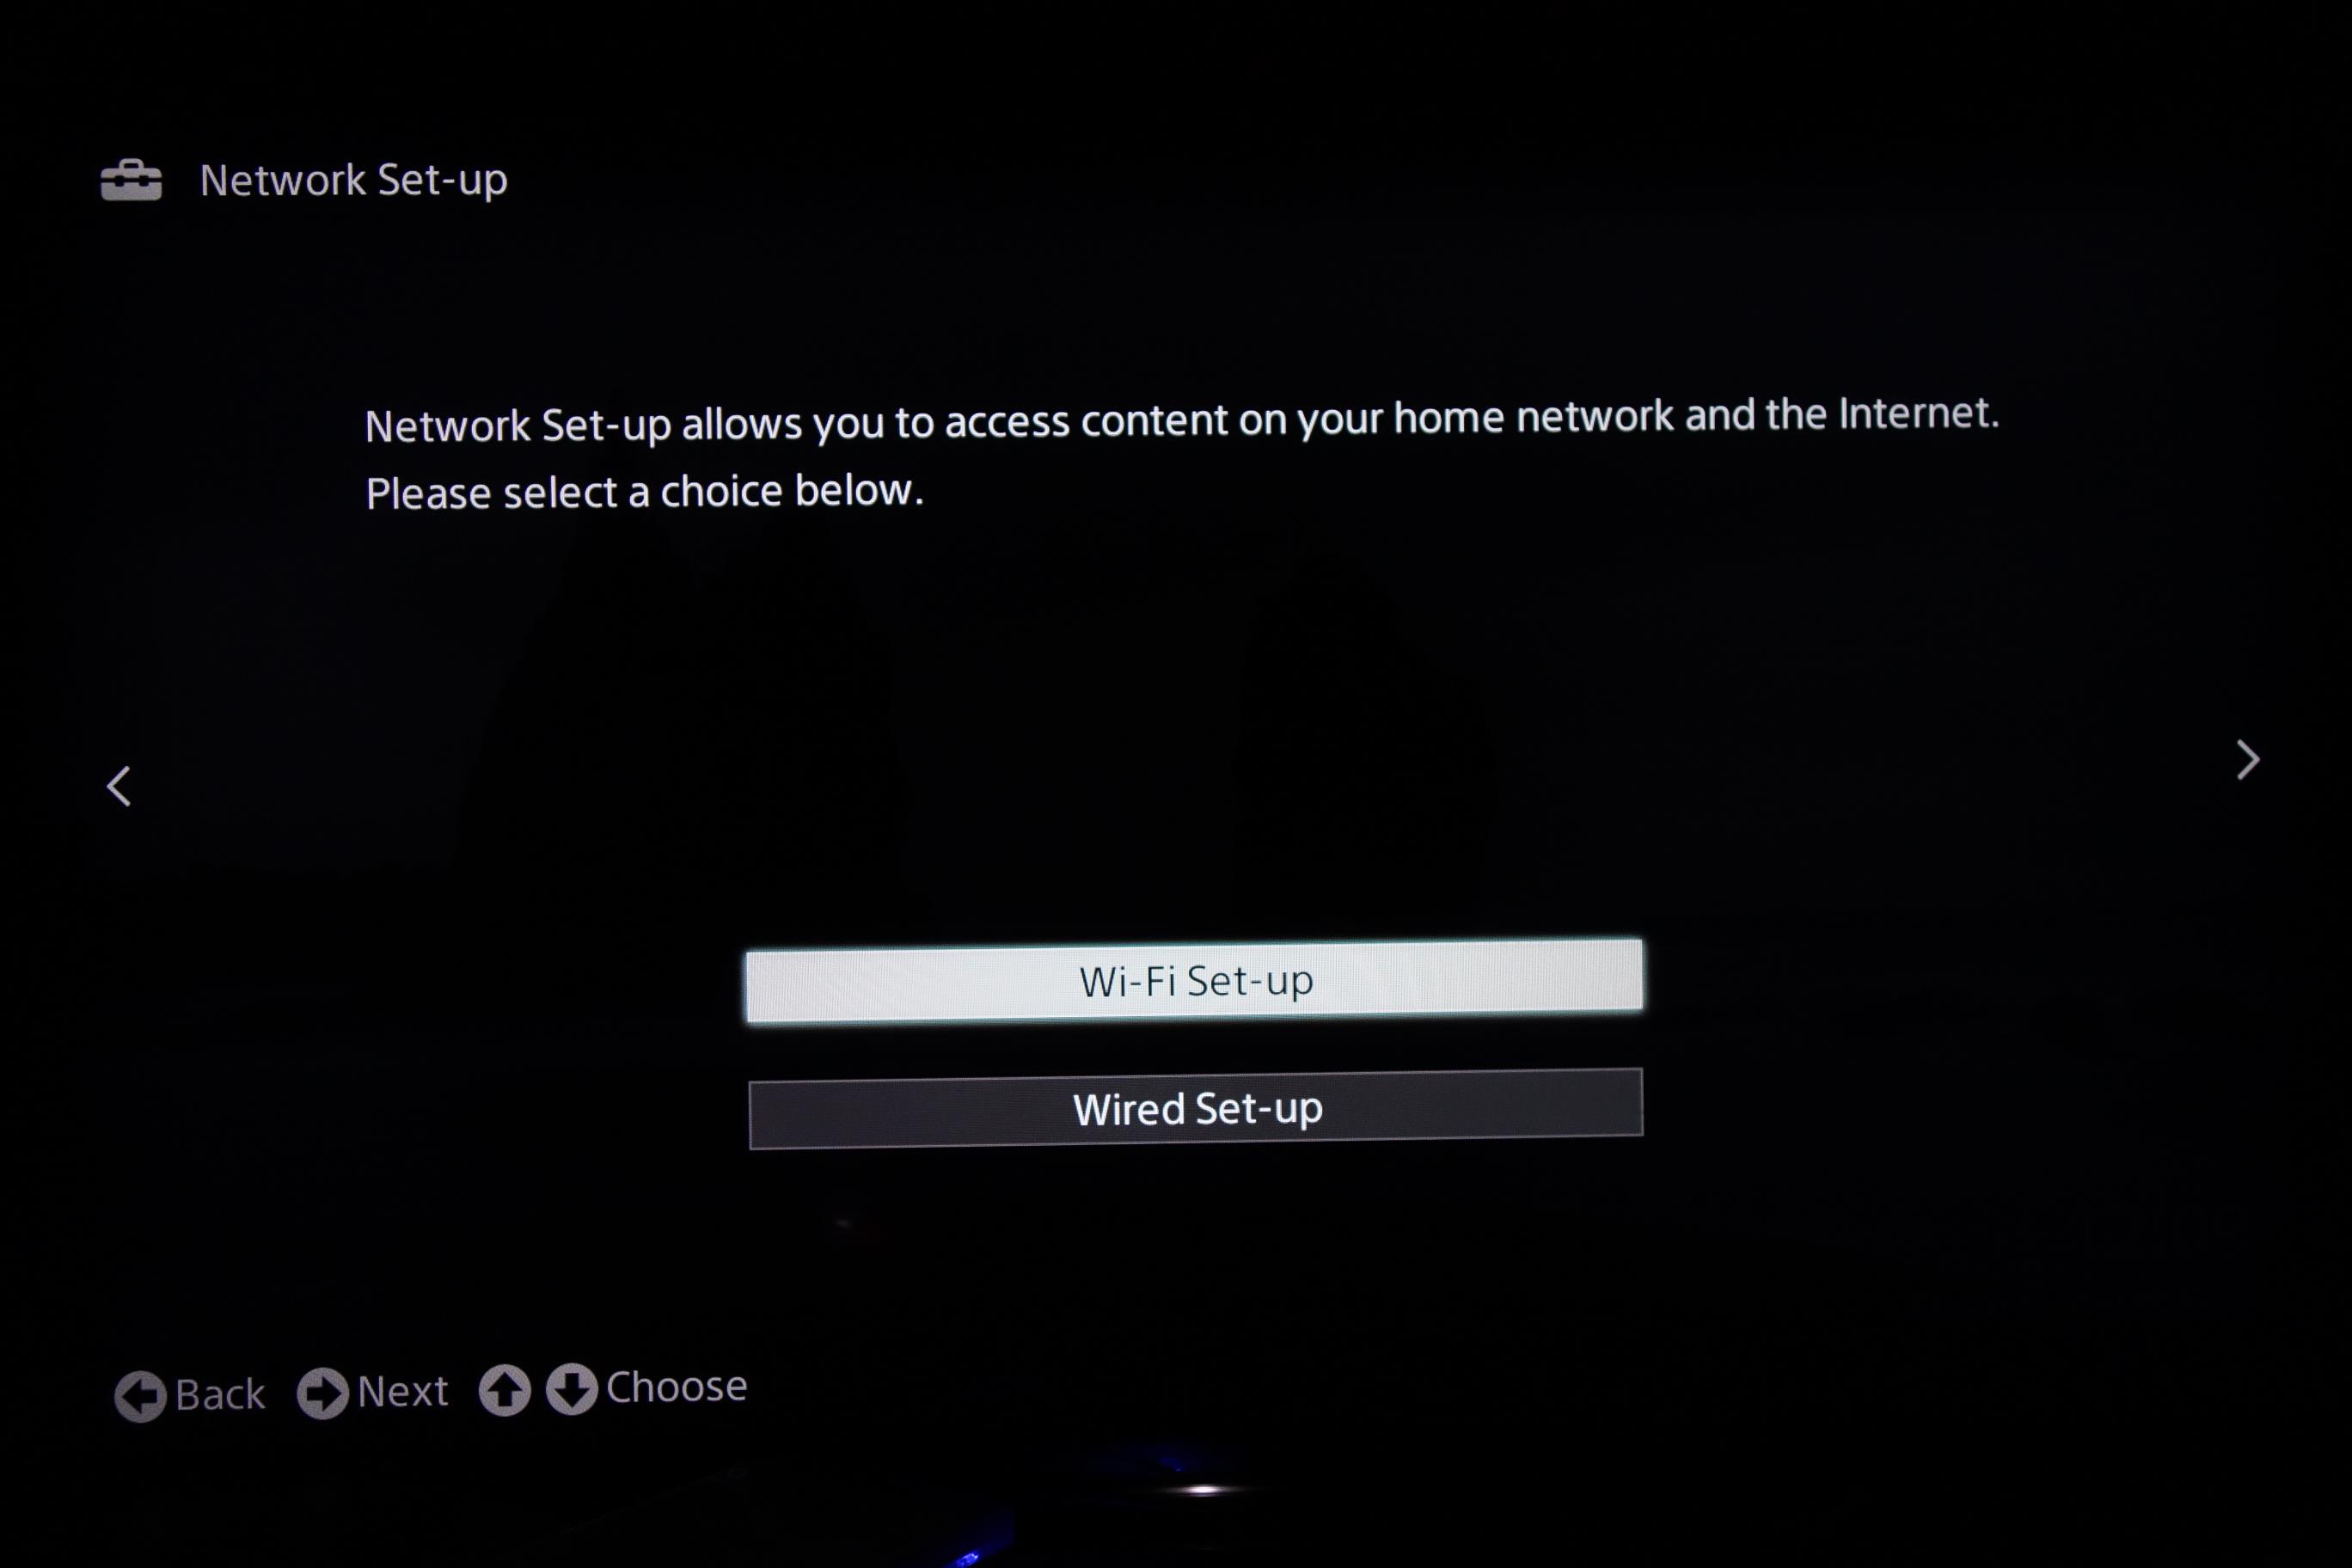
Network Setup
The following screen will ask for confirmation on which type of Internet Connection you'd like to use. If you're using Wi-Fi, please select Wi-Fi Set-Up.
For the purpose of this tutorial, we're selecting Wi-Fi Set-Up.
Continue with your wireless set up by selecting the network you intend to connect to and proceed to the next screen to enter your Wi-Fi password.
The next menu is the most important as this is where you will tell the TV that you will be setting your own DNS servers. Please select Manual when the IP Address Setting appears.
Set DNS on TV
Once you've selected Manual in the previous window, you will be presented with a list of fields to fill in. The IP address can be anything you want, however please ensure that the first three fields are the same as your router.
For example, if your router's IP address is 192.168.0.1 please start the IP address with 192.168.0.xxx
Only change the final field. Leave the first three the same as what your router uses.
Once you've entered that, please enter the DNS addresses that appeared on your browser earlier into the fields shown in this screen.
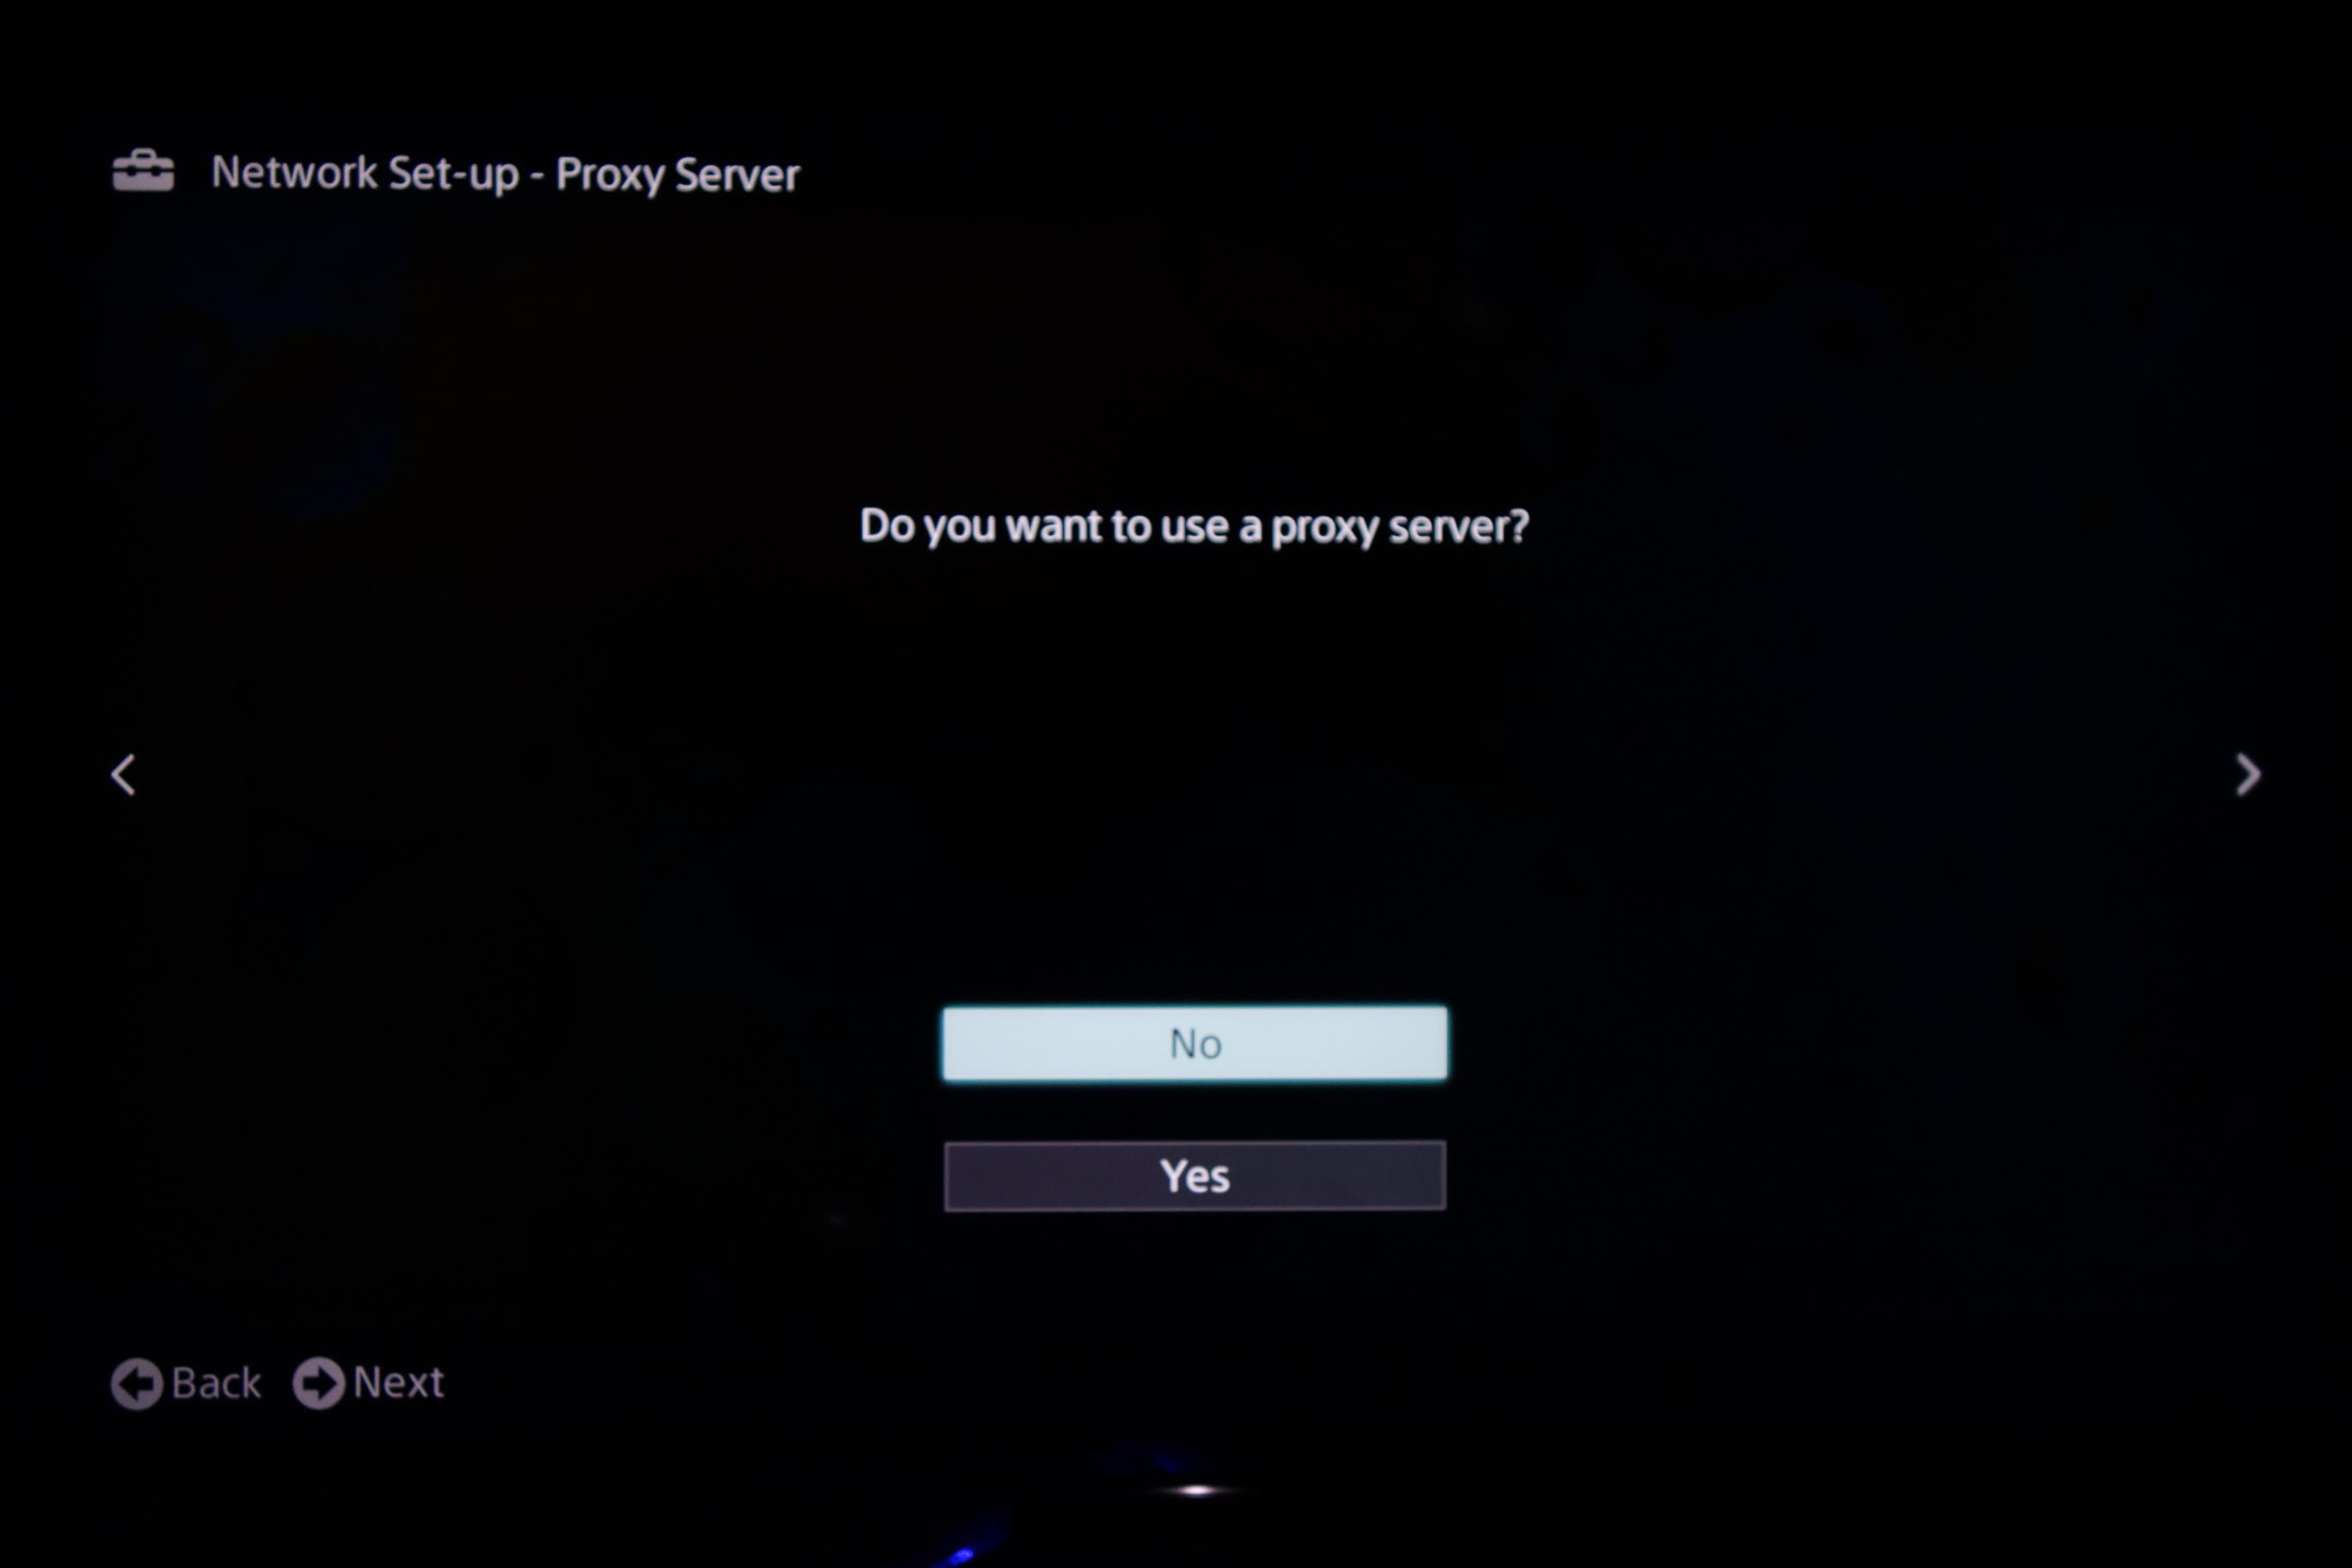
Once the IP address settings have been finalised, you will be greeted with a request to use a Proxy Server. Please select No.
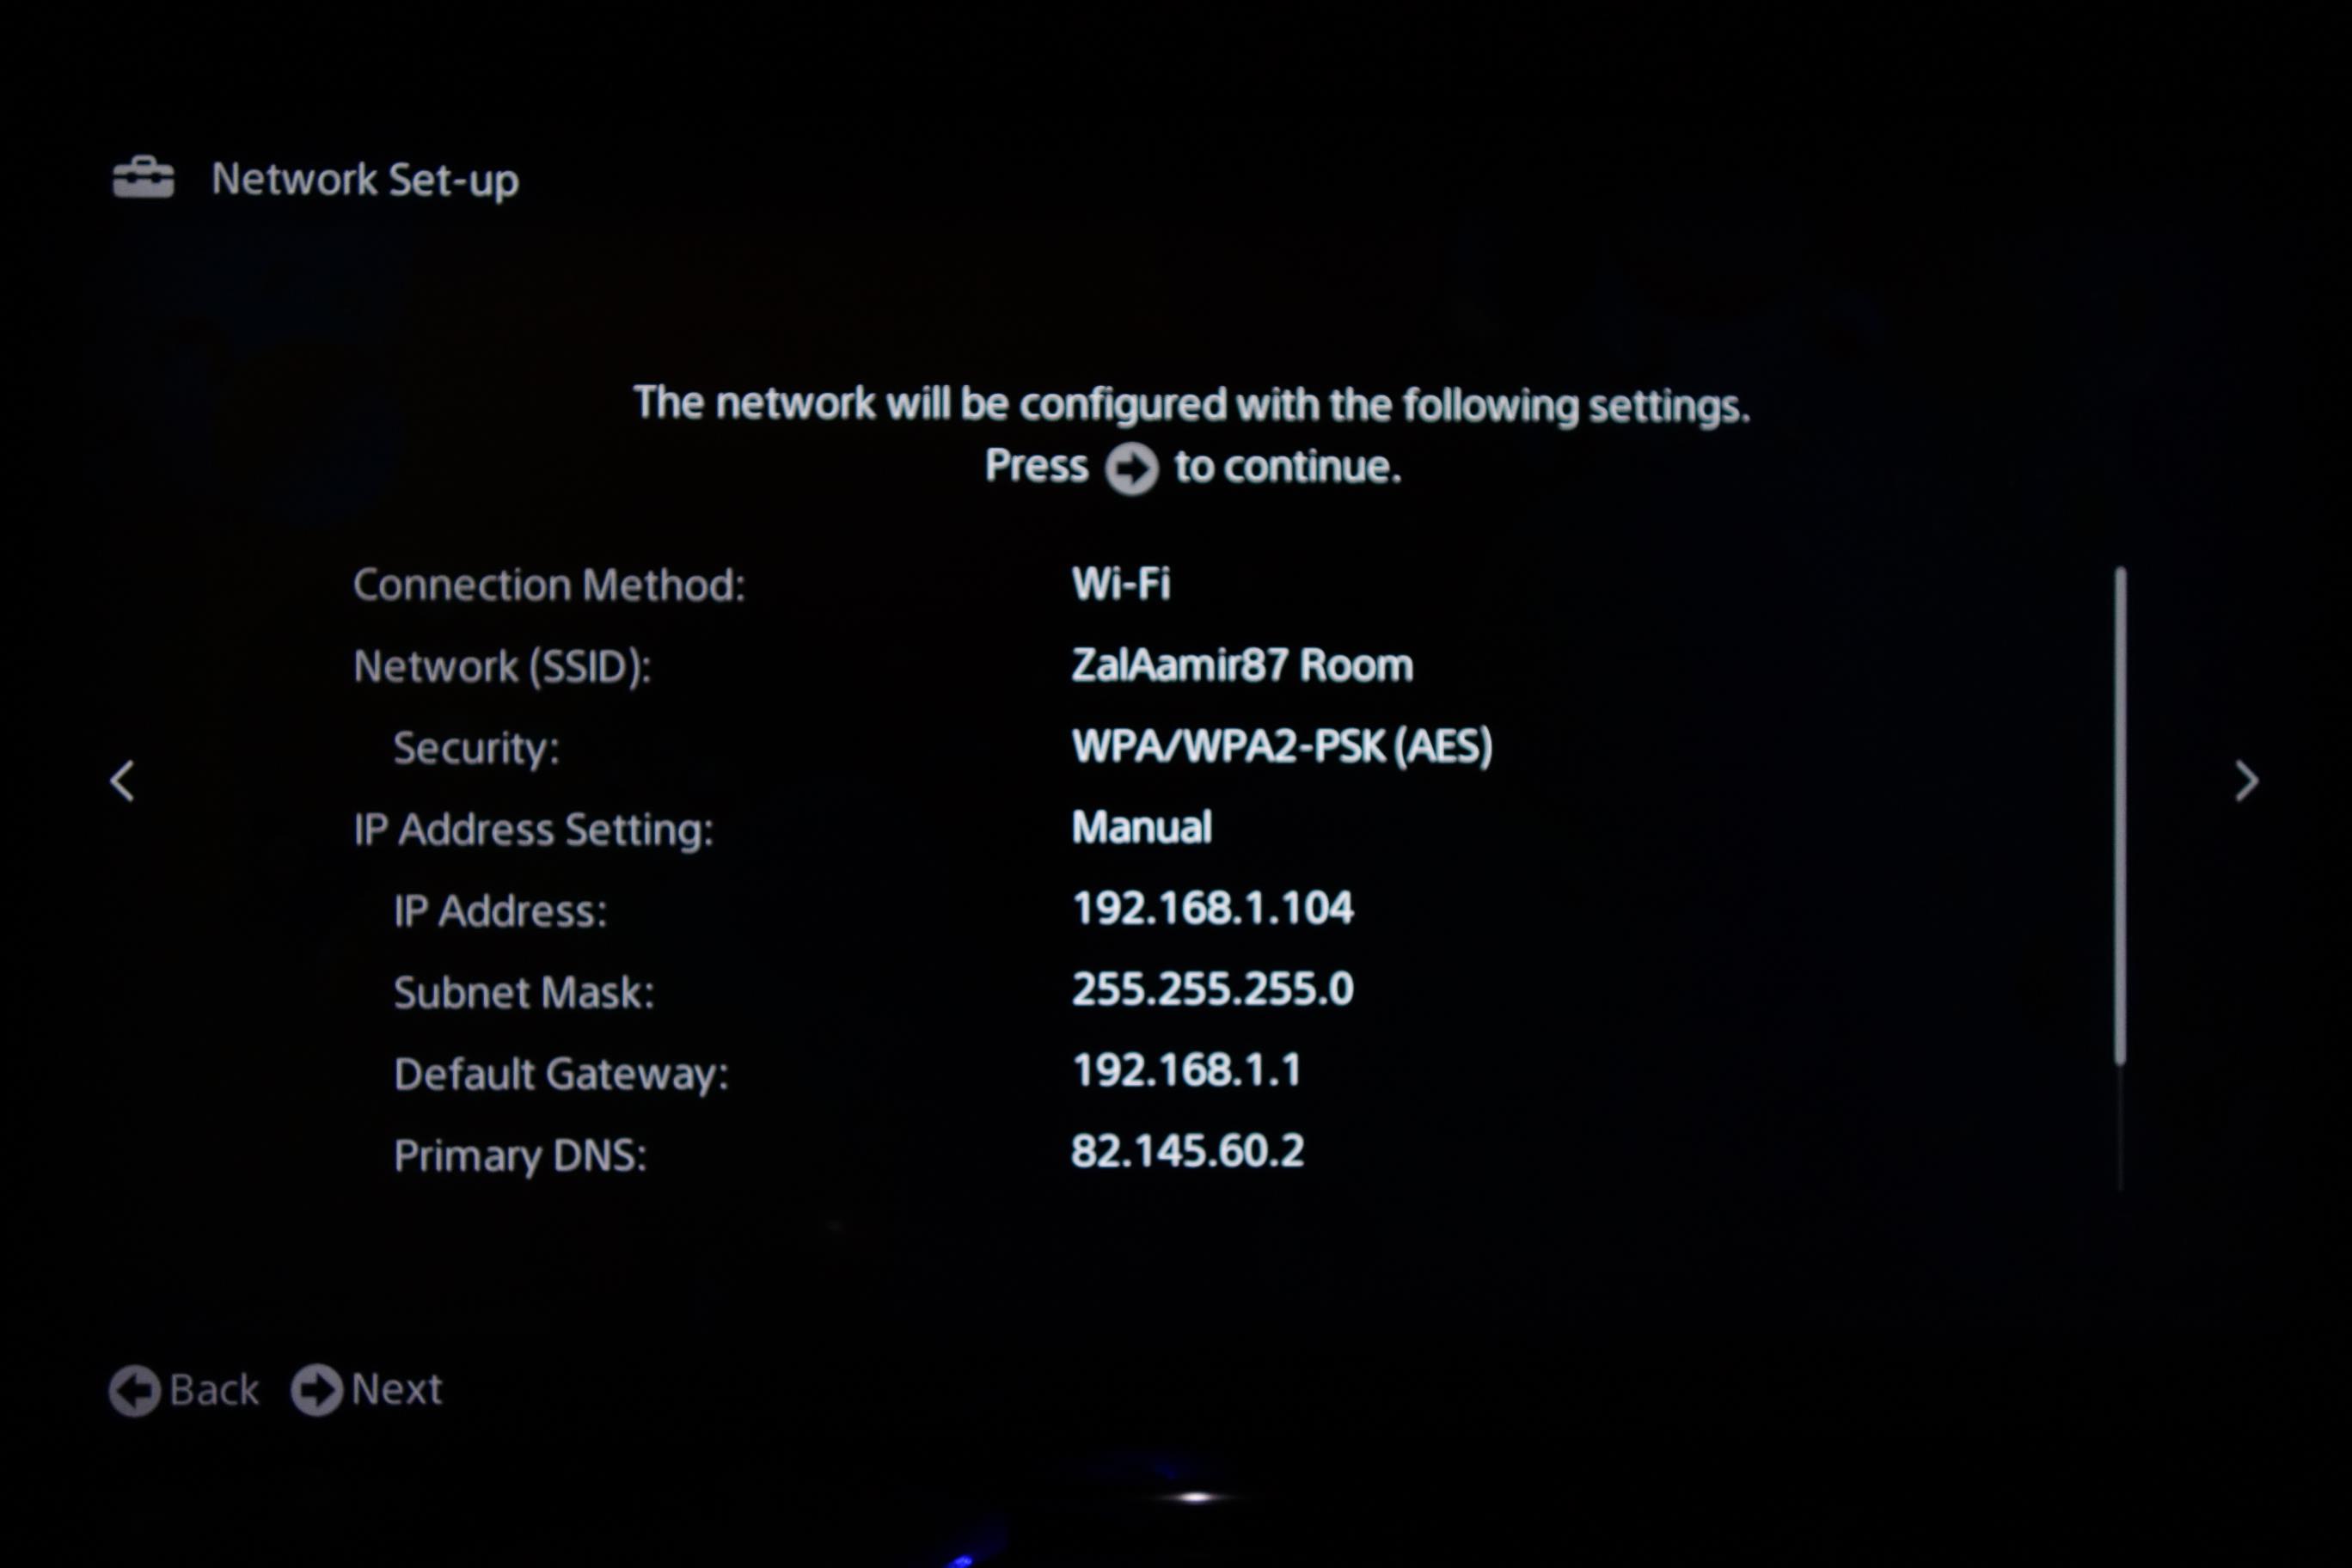
Save and Test Connection
The next screen will confirm the details entered during the network setup.
Press the right arrow on your remote to continue.
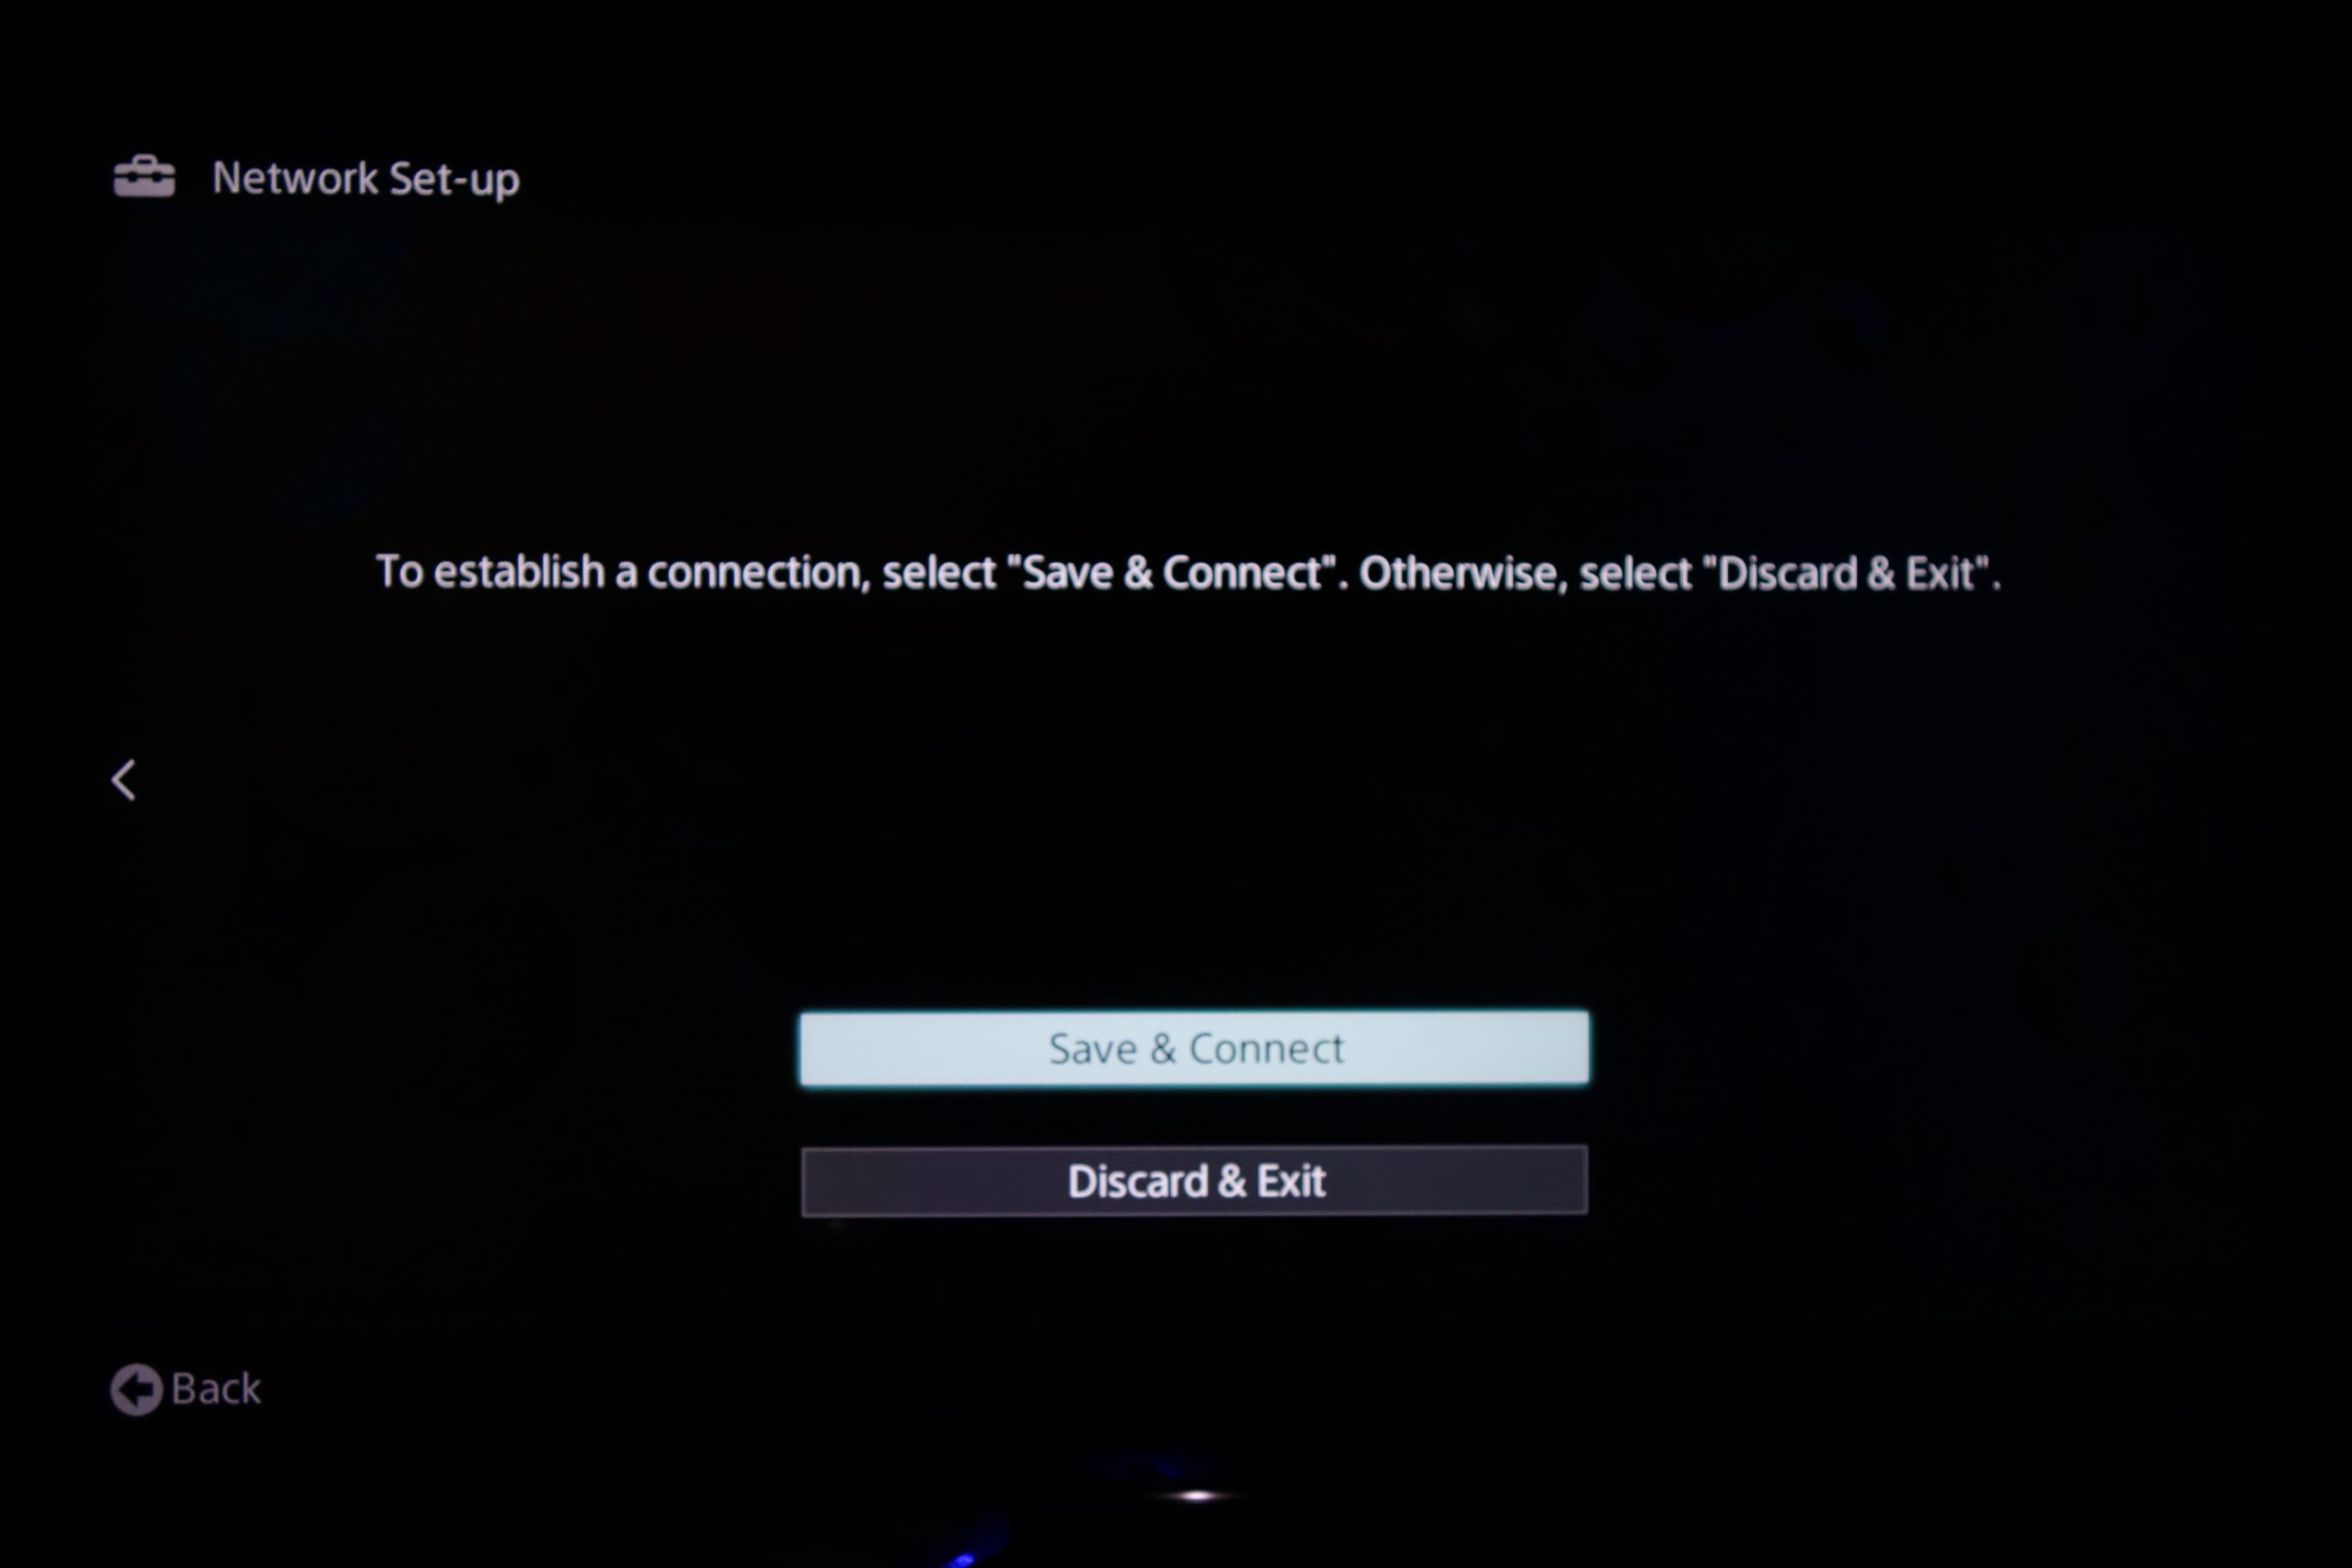
Finally, please select Save & Connect. This will test your connection to ensure there is no problem with your Internet connection.
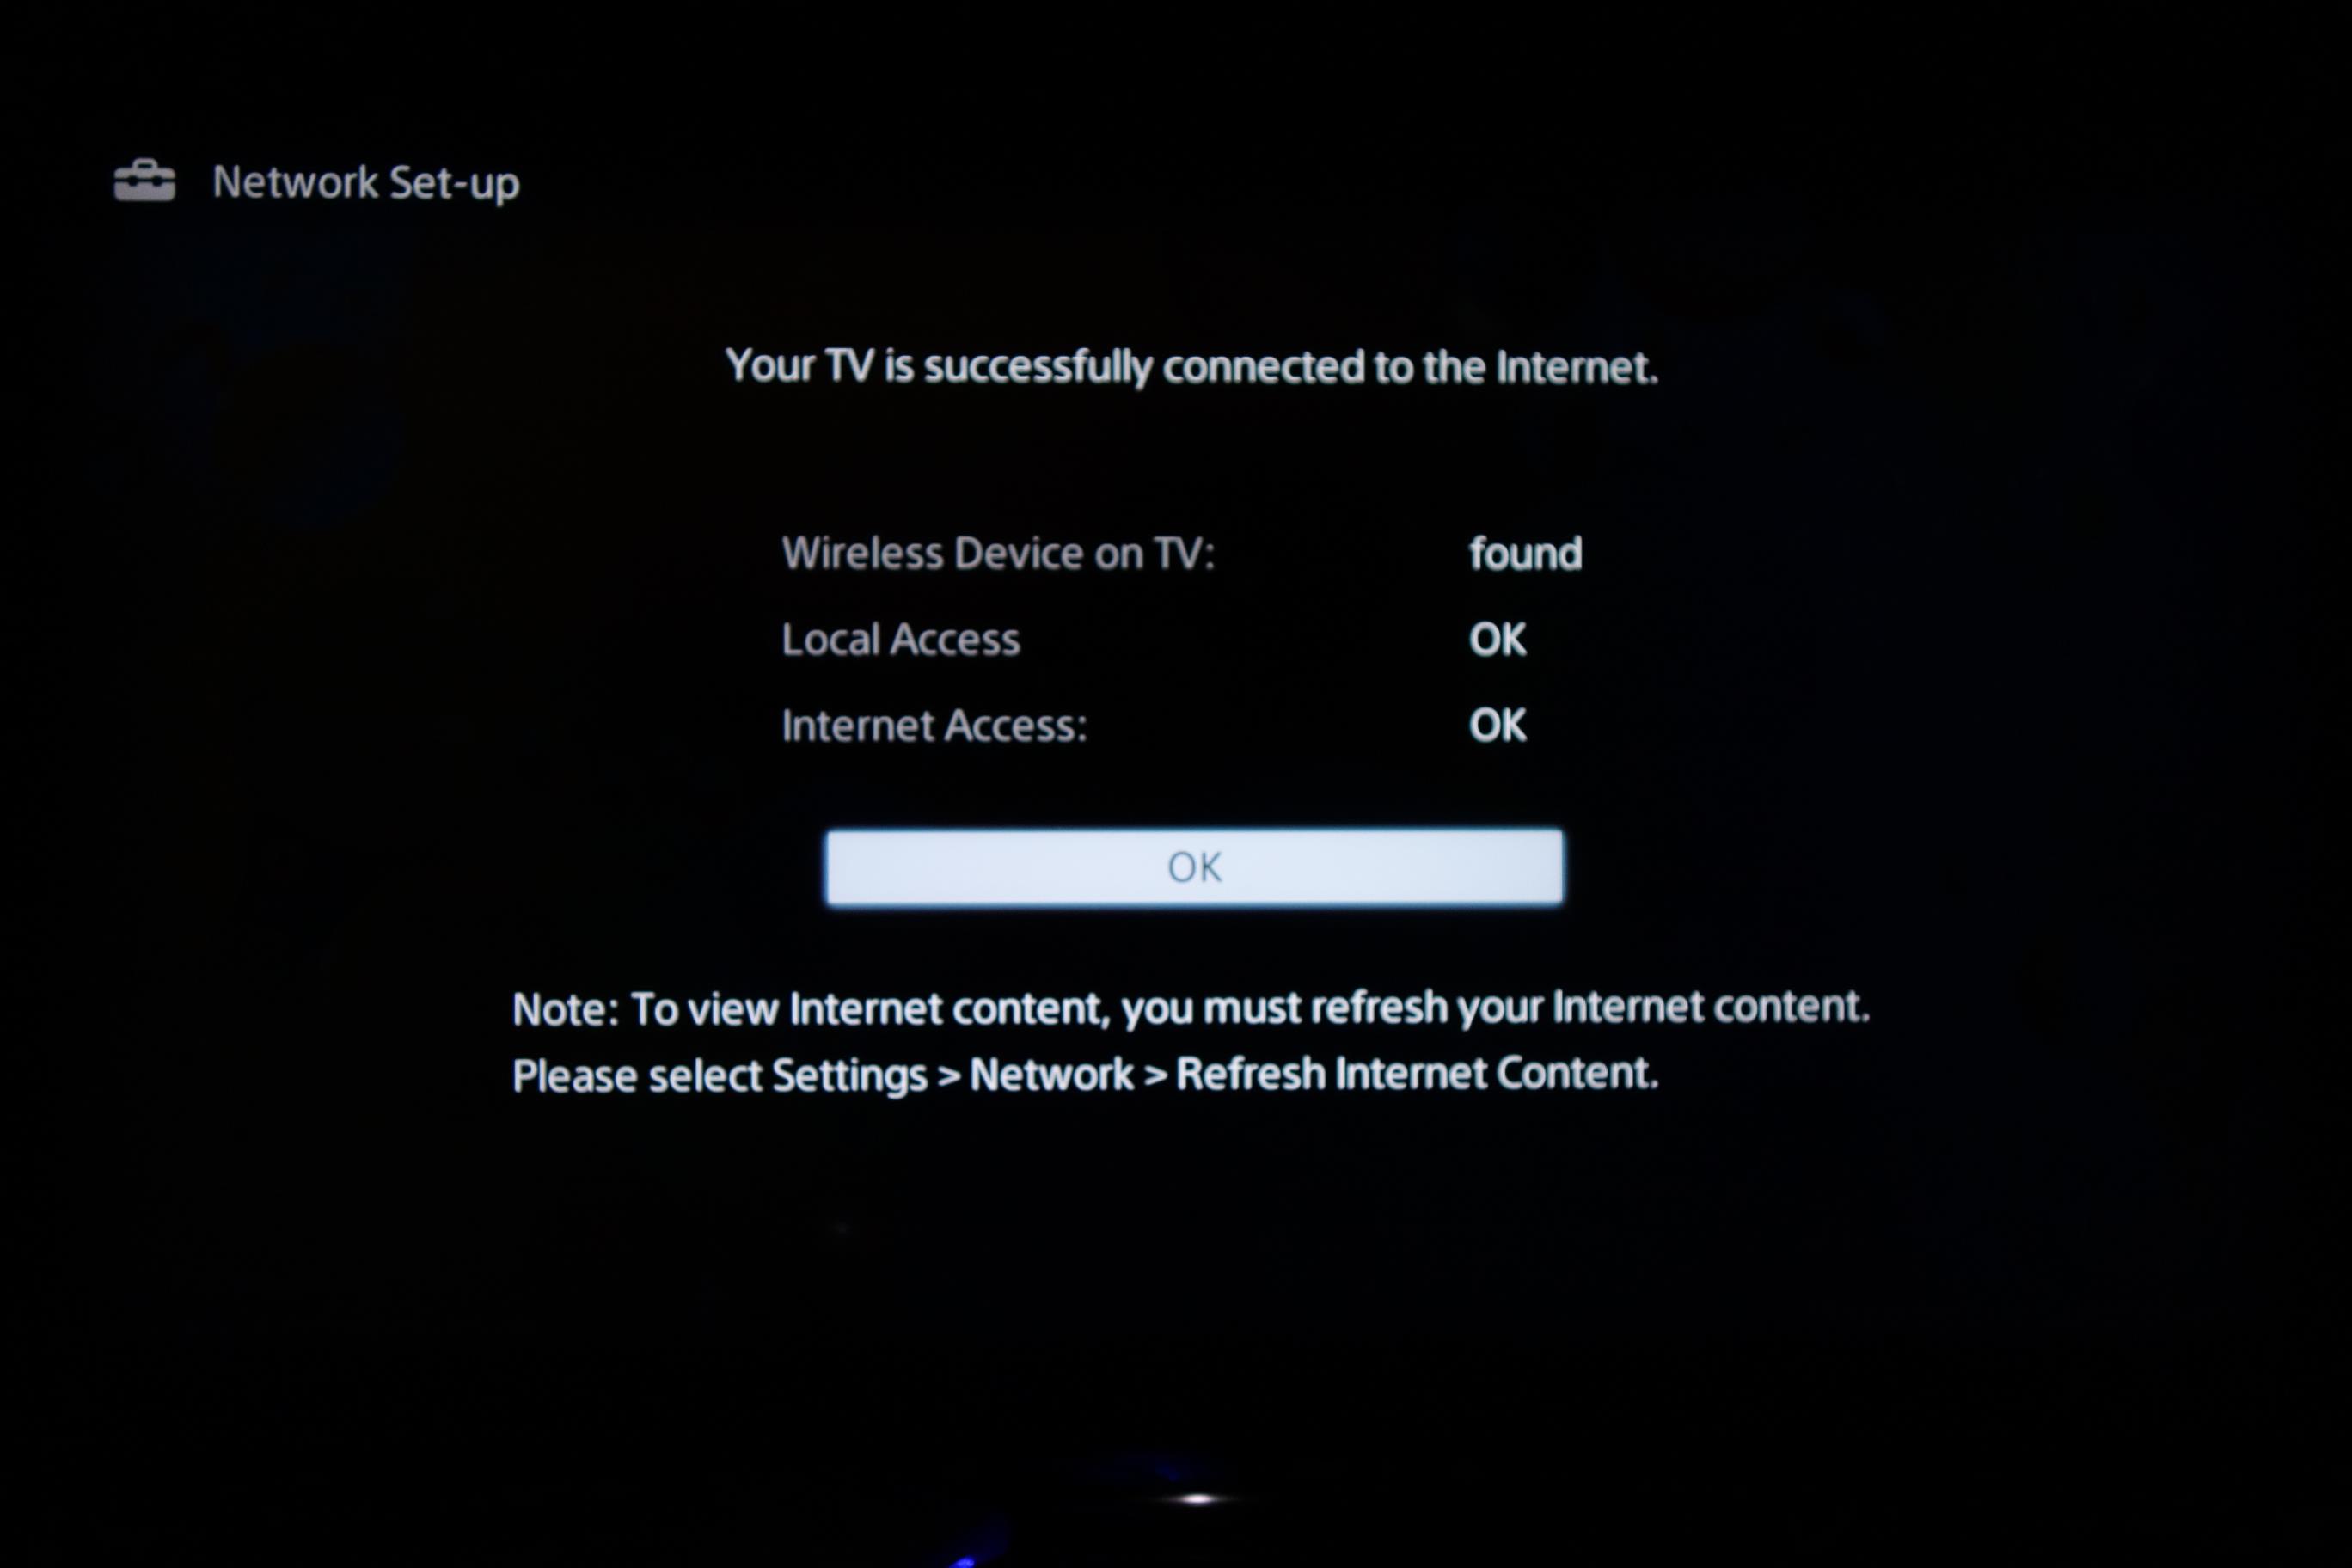
Congratulations! If you see the screen shown below, it means the configuration is complete and you should now be able to watch the TV channel of your choice.
Sony Smart TV Setup Complete
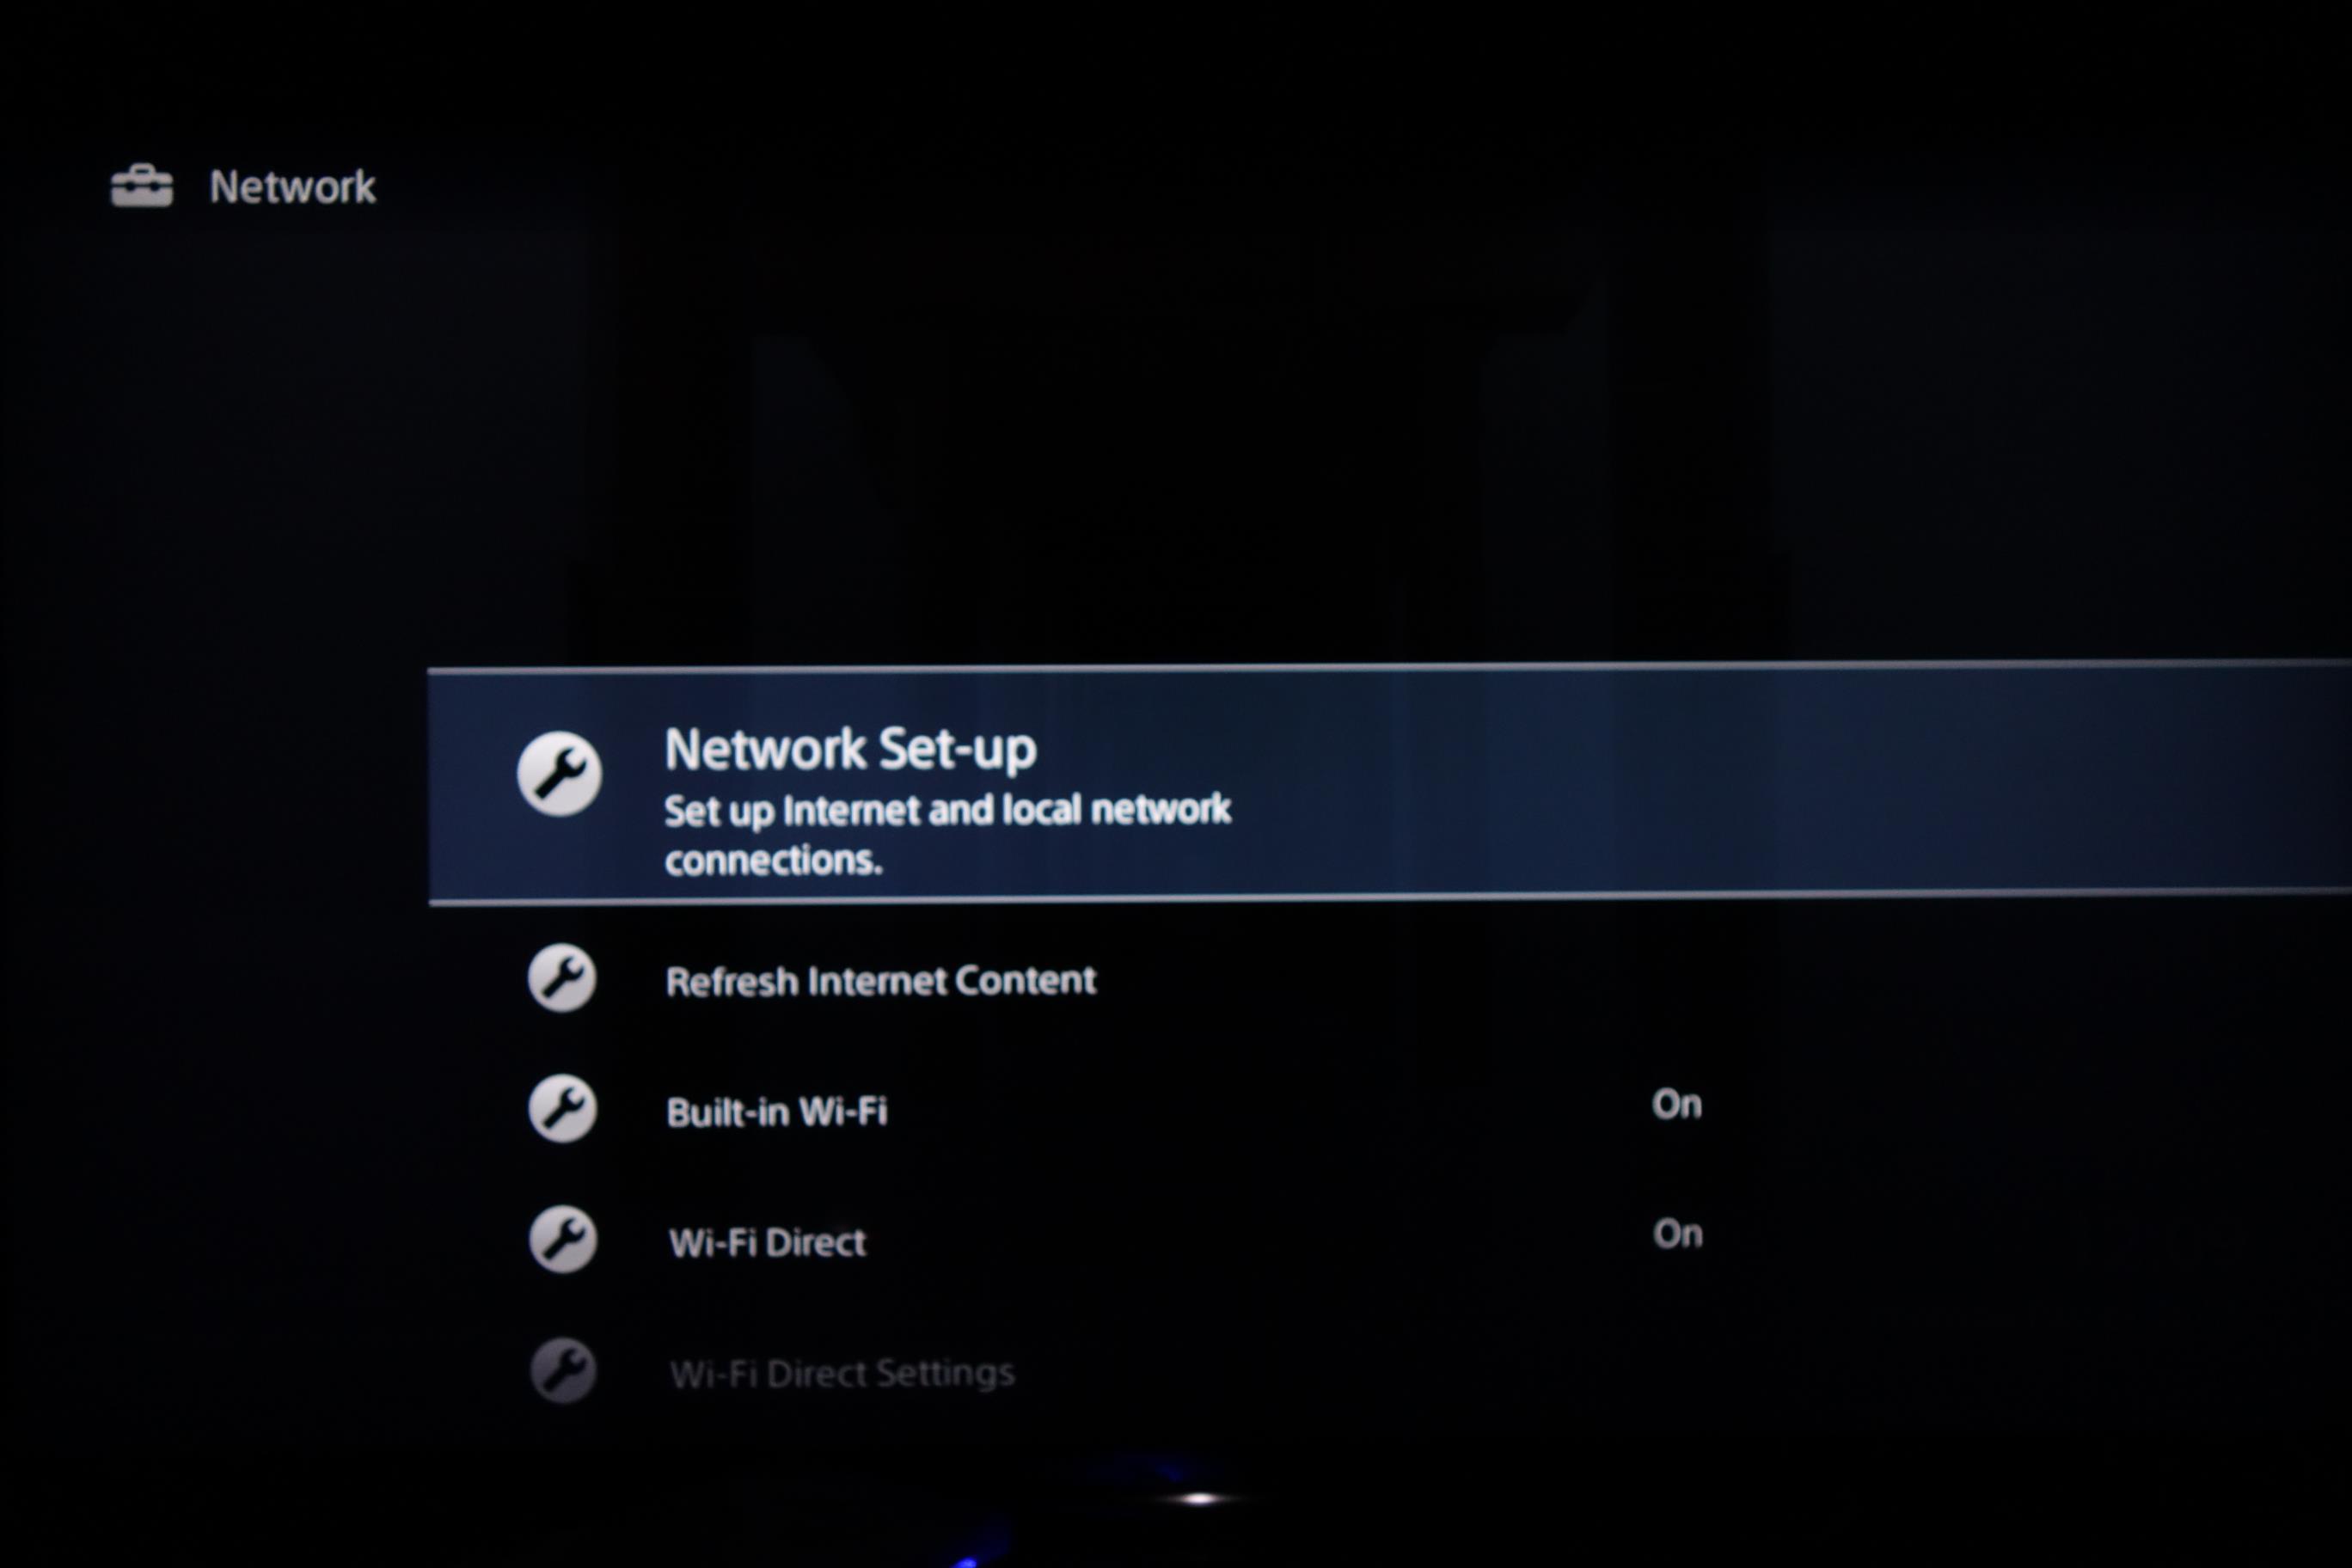
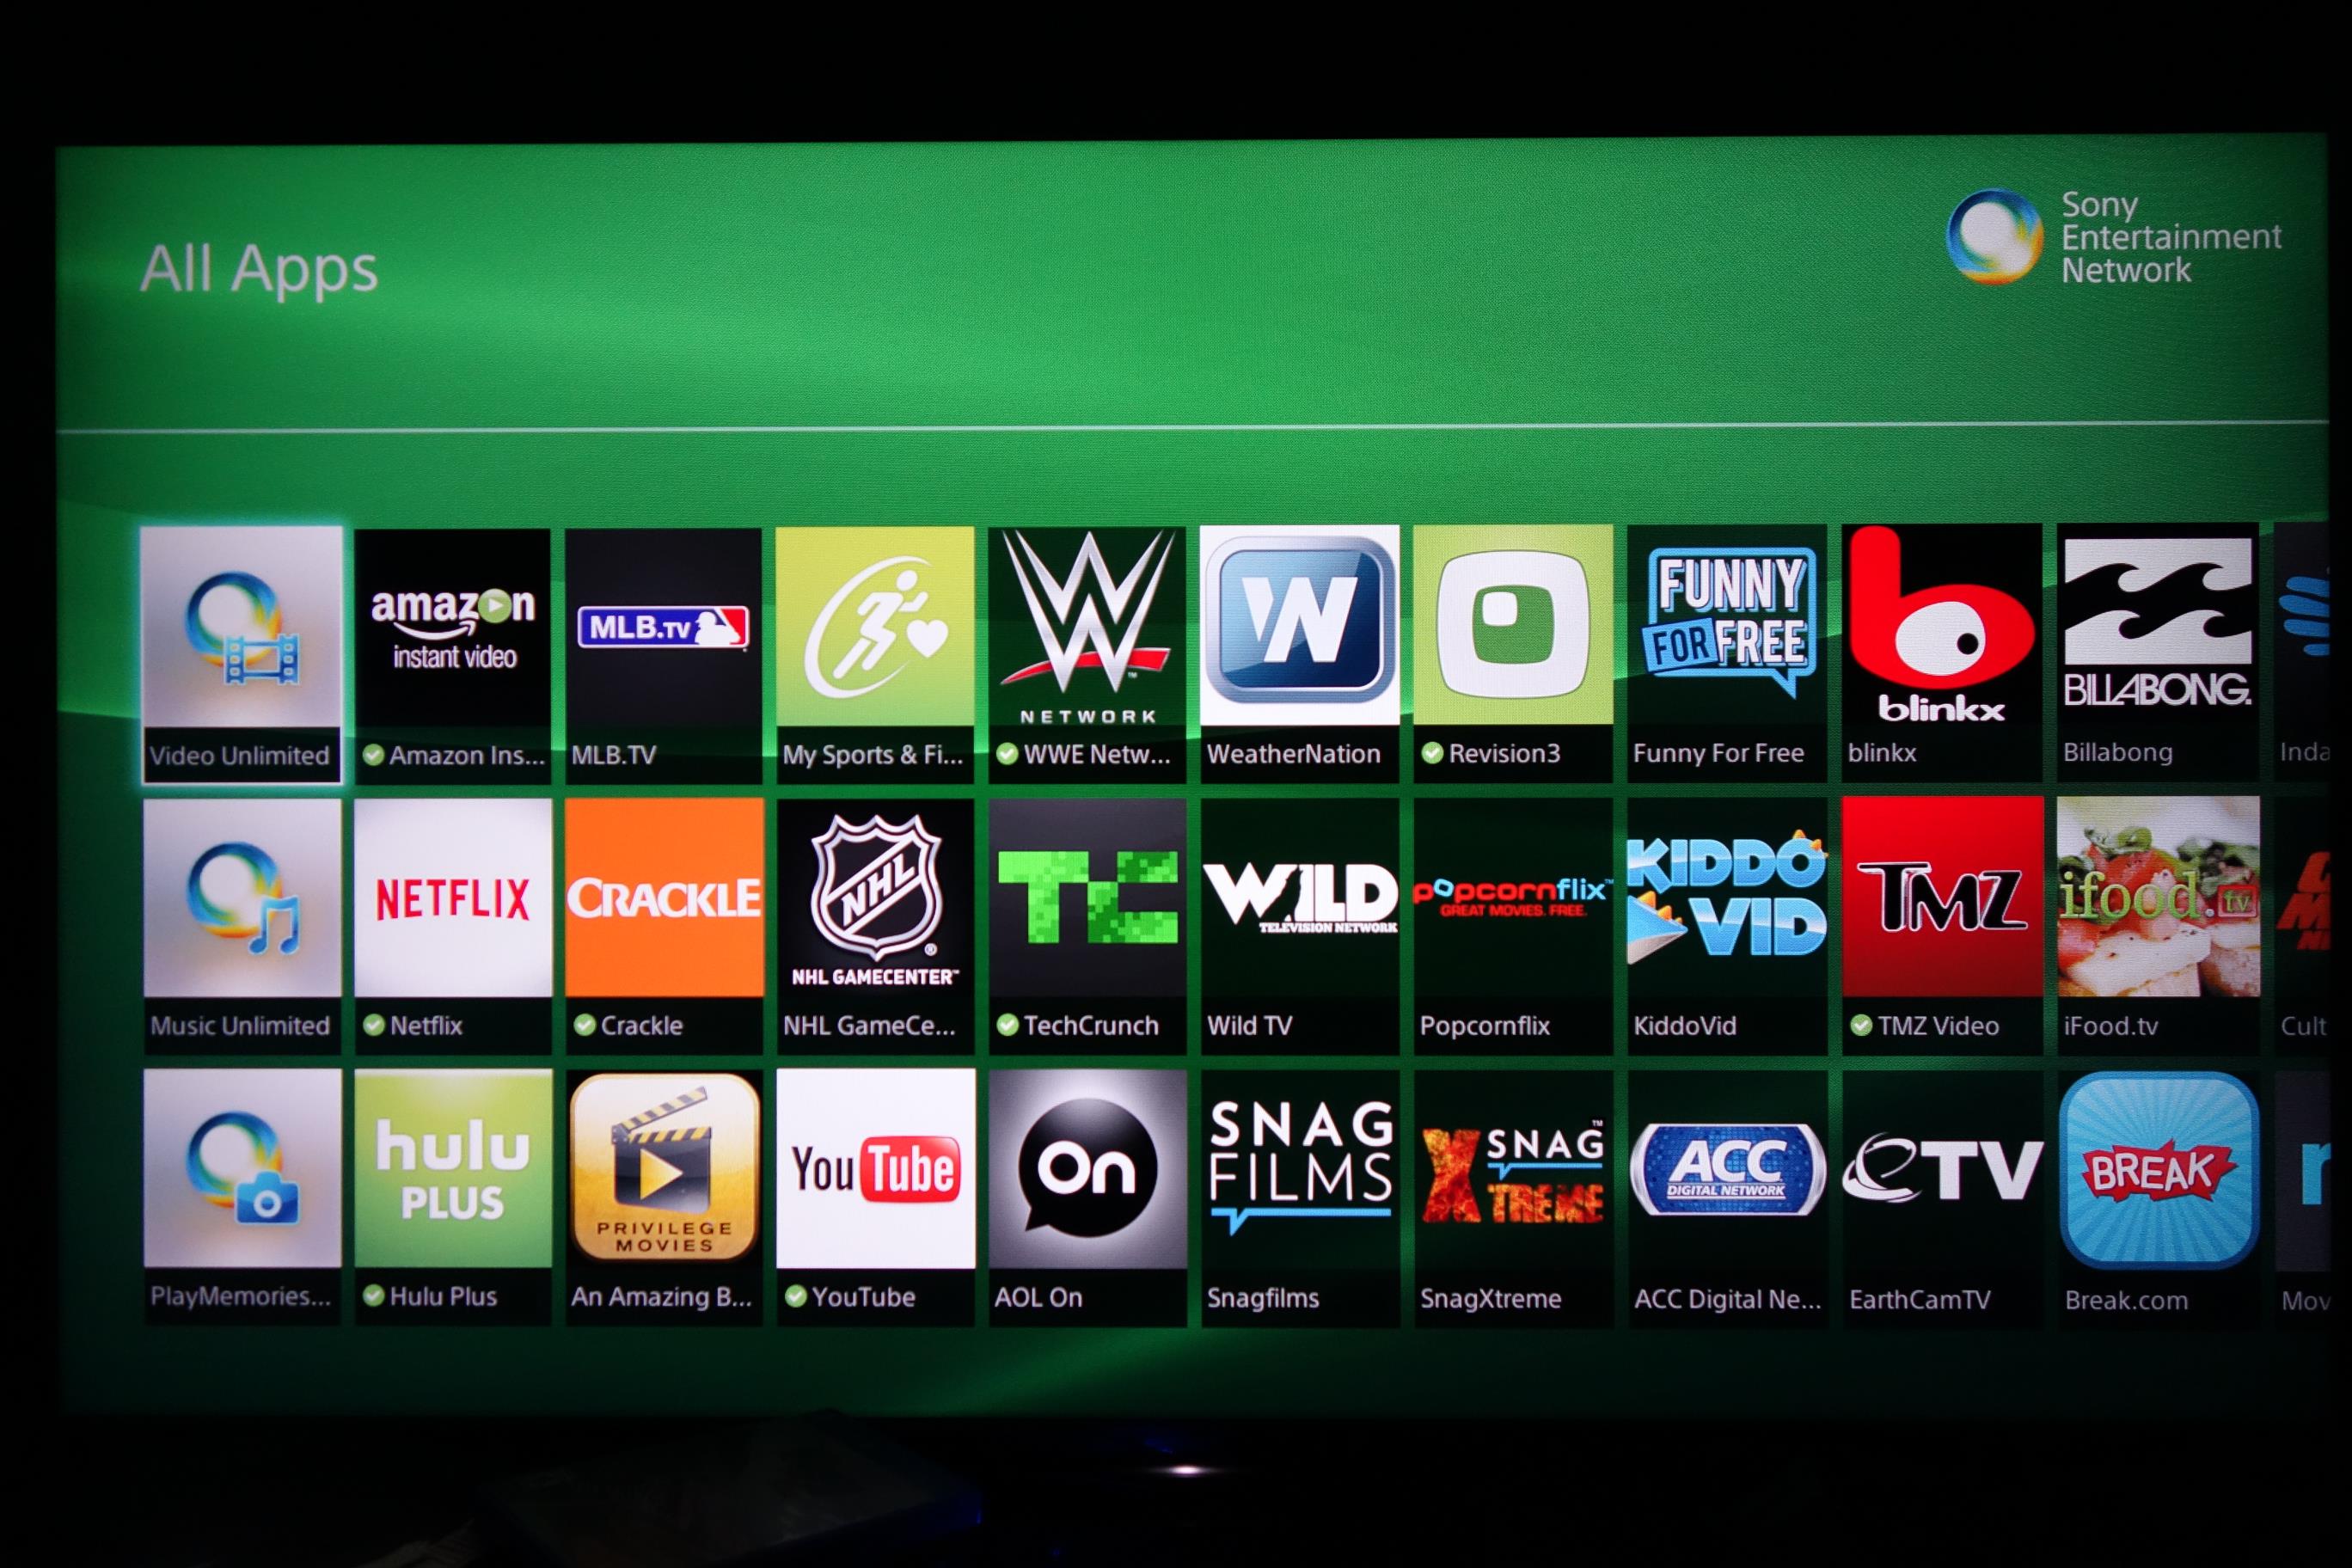
To download the region restricted apps to your Bravia TV, all you need to do is go back to the main network menu and select Refresh Internet Content.
Allow it to refresh and the apps will appear in the All Apps menu at the bottom left of your TV.
Now that you have setup and registered your system you can go ahead and access the TV site of your choice and stream it like you mean it!.
For the full list of supported channels, please refer to our Supported Services page.
Any problems?
Unfortunately it doesn't always go to plan! If you are having problems please email us at support@simpletelly.com and we will do our best to assist you.
This page will guide you through the setup process on a Sony Bravia Smart TV.
Note, while the Bravia has an inbuilt web browser, we recommend that you use a computer to register your IP on our network.
Please ensure that you have completed this and you are able to connect to the Internet from the TV before trying the steps below.
Login to our website, www.simpletelly.com from a computer on the same network as your TV.
Take note of the fastest DNS server address that appears on screen.
Register DNS on Network
Now, click on Check My Setup.
If this is the first device you have setup from this location, you will probably need to register your current IP address. Click on Register your new IP address.
If the registration is done from a computer browser rather than using the device's browser, you will get this error on screen. You can disregard this as the DNS is set up on the device and you just need to ensure that the Registered IP address is the same as your Public IP address.
Network Menu
From your Bravia Sony Entertainment Network (SEN) Screen, please navigate to the top right hand corner of the screen to find the Settings menu.
Once you've selected the Settings menu, scroll down to the Network option.
Next, you will be taken to a list of options to choose from. Please choose the first option, which is Network Set-up.
Network Setup
The following screen will ask for confirmation on which type of Internet Connection you'd like to use. If you're using Wi-Fi, please select Wi-Fi Set-Up.
For the purpose of this tutorial, we're selecting Wi-Fi Set-Up.
Continue with your wireless set up by selecting the network you intend to connect to and proceed to the next screen to enter your Wi-Fi password.
The next menu is the most important as this is where you will tell the TV that you will be setting your own DNS servers. Please select Manual when the IP Address Setting appears.
Set DNS on TV
Once you've selected Manual in the previous window, you will be presented with a list of fields to fill in. The IP address can be anything you want, however please ensure that the first three fields are the same as your router.
For example, if your router's IP address is 192.168.0.1 please start the IP address with 192.168.0.xxx
Only change the final field. Leave the first three the same as what your router uses.
Once you've entered that, please enter the DNS addresses that appeared on your browser earlier into the fields shown in this screen.
Once the IP address settings have been finalised, you will be greeted with a request to use a Proxy Server. Please select No.
Save and Test Connection
The next screen will confirm the details entered during the network setup.
Press the right arrow on your remote to continue.
Finally, please select Save & Connect. This will test your connection to ensure there is no problem with your Internet connection.
Congratulations! If you see the screen shown below, it means the configuration is complete and you should now be able to watch the TV channel of your choice.
Sony Smart TV Setup Complete
To download the region restricted apps to your Bravia TV, all you need to do is go back to the main network menu and select Refresh Internet Content.
Allow it to refresh and the apps will appear in the All Apps menu at the bottom left of your TV.
Now that you have setup and registered your system you can go ahead and access the TV site of your choice and stream it like you mean it!.
For the full list of supported channels, please refer to our Supported Services page.
Any problems?
Unfortunately it doesn't always go to plan! If you are having problems please email us at support@simpletelly.com and we will do our best to assist you.